Deploying Your Application to the Cloud
This is the final post in the following series: Building a Spring Boot CRUD App With Postgres from Scratch: The Complete Guide.
This guide follows on from Dockerizing Your Application.
We've come a long way from creating our skeleton Spring Boot app, to adding production features like authentication and database migration, to now having a fully Dockerized application. We're now ready to share our glorious creation with everyone on the internet!
By the end of this post, your application will be running on the internet and automatically tested and deployed whenever you push code to GitHub.
Docker Compose
Now just before we deploy our app to the internet, I think it's important to briefly mention Docker compose and how it could help ourselves and other collaborators run our application in Docker.
Currently, we have a standard Dockerfile for our application and before running our application, we have to manually start up a Postgres database in Docker to get our app working.
This is fine but to get our app working, environment variables must be configured manually and there isn't one command to easily start our entire stack.
This is where Docker Compose can help.
What is Docker Compose?
Docker Compose allows us to define multiple containers in a single file.
Instead of remembering several commands and manually launching several containers, we describe our application stack declaratively:
- Application container
- PostgreSQL container
- Environment variables
- Networking
- Startup configuration
Then everything can be started with a single command:
docker compose up
Docker compose is like Infrastructure as code (IaC) for your local development environment. It is not intended for large-scale production deployments, but is great for local development. Instead, for large-scale production deployments you could use something like Terraform.
Adding Docker Compose
To add Docker Compose we will need to create a compose.yml file in our project. Then add the following content:
services:
  postgres:
    image: postgres:17
    container_name: crud-postgres
    environment:
      POSTGRES_DB: test_db
      POSTGRES_USER: dev
      POSTGRES_PASSWORD: password
    ports:
      - "5432:5432"
    volumes:
      - postgres-data:/var/lib/postgresql/data

  app:
    build: .
    container_name: crud-app
    ports:
      - "8080:8080"
    environment:
      SPRING_DATASOURCE_URL: jdbc:postgresql://postgres:5432/test_db
      SPRING_DATASOURCE_USERNAME: dev
      SPRING_DATASOURCE_PASSWORD: password
      ADMIN_PASSWORD: supersecure
      ADMIN_EMAIL: admin@example.com
    depends_on:
      - postgres

volumes:
  postgres-data:
We can then start everything together:
docker compose up --build
You should see something similar to this.
 ✔ Image spring-crud-postgres-example-app       Built                                                                                                                              0.2s
 ✔ Network spring-crud-postgres-example_default Created                                                                                                                            0.0s
 ✔ Container crud-postgres                      Created                                                                                                                            0.0s
 ✔ Container crud-app                           Created                                                                                                                            0.0s
Attaching to crud-app, crud-postgres
NOTE: If you receive a similar message to this:
Error response from daemon: driver failed programming external connectivity on endpoint crud-postgres (6ea468a18ad3748595d5e54c346c13c520c0ef316bd3879a629417cd927ecb30): Bind for 0.0.0.0:5432 failed: port is already allocated
This means the old Docker container for Postgres is running. You can run the following to stop and remove the old container, before trying to run the previous Docker compose command again.
docker stop postgres && docker rm postgres
Container Networking
Something to note is how the networking is set up when using containers.
This works:
spring:
  datasource:
    url: jdbc:postgresql://postgres:5432/test_db
Where as this doesn't:
spring:
  datasource:
    url: jdbc:postgresql://localhost:5432/test_db
This is because each container has its own network namespace. So pointing to localhost in the crud app container actually refers to itself inside the container, rather than the Postgres container. This is different when using our local machine as everything is hosted on localhost.
Docker Compose automatically creates a network and registers services by name.
Startup Ordering Problems
You might occasionally see an error like:
Connection refused
Unable to obtain JDBC connection
This is because Docker starts containers in dependency order:
- Start Postgres container
- Start application container
However, "Started" does not mean "Ready to accept database connections", PostgreSQL might still be initialising.
To fix this issue, we can add a health check to our Postgres database container:
postgres:
  image: postgres:17
  # ...
  healthcheck:
    test: [ "CMD-SHELL", "pg_isready -U dev -d test_db" ]
    interval: 5s
    timeout: 5s
    retries: 5
Then add the following depends_on block to the crud app:
app:
  # ...
  depends_on:
    postgres:
      condition: service_healthy
Now our crud app won't start up until the PostgreSQL database reports that it is ready.
Deploying to Production (the Internet!)
Hopefully Docker compose can give some insight into how we can use IaC to define how we want to deploy our application and other infrastructure such as databases. The next step is to do this for real!
Now in a commercial production environment, deployments can vary drastically. However, building and deploying software commercially usually follows a similar pattern using something we call the Software Development Life Cycle (SDLC), which is a structured framework that outlines the phases required to plan, build, test, deploy, and maintain software.
This blog series is only creating something for demo purposes so we don't need to strictly adhere to the SDLC. To explain the SDLC in detail would warrant its own blog post, but I thought it would be good to touch on a few points to help us with our application.
What Production Teams Usually Add (CI/CD)
Usually production teams will have some sort of Continuous Integration and Continuous Deployment/Delivery (CI/CD) pipeline setup that will automatically perform some steps triggerd when pushing any code to a repo.
So right now in our example, pushing code to the GitHub repository does nothing, other than save our code onto the GitHub servers. However, we could add a CI/CD tool to perform some actions for us after pushing our code. Examples of CI/CD tools include Jenkins, GitHub Actions, GitLab CI/CD, Argo CD and Azure DevOps.
These actions performed after pushing code can be pretty much anything you want. To give you an idea, some actions could include:
- Building and testing code with a build tool (Gradle/Maven/NPM)
- Make sure the code compiles
- Run unit tests, integration tests, end-to-end tests, mutation tests etc
- Measure code test coverage
- Linting/static analysis of code
- Detecting bugs
- Finding code smells
- Identifying duplicated code
- Dependency scanning to identify vulnerable dependencies
- Container scanning where images can be scanned for known CVEs before deployment
- Tagging new versions of your application
- Deploying your application to various environments (including production)
- Using IaC tools like Terraform to define infrastructure (Databases, Caches etc.)
- Deploying applications to cloud providers like Amazon Web Services (AWS)
Usually, each team will have different actions they would like to perform, and CI/CD tools give you that flexibility whilst making sure you are consistently running the same automated actions after each code push.
Continuous Integration with GitHub Actions
So our application works locally and we can run the tests successfully. But what happens if someone collaborating with us (or even us) pushes code to GitHub that breaks the tests? Right now we have no way of knowing unless we pull down the code and run the tests locally ourselves.
That's where we can use CI to help us identify when broken code has been pushed to GitHub.
Setting up Continuous Integration will automatically build and test our application whenever code changes. Then on a pass, the CI tool will allow us to merge our branch to the root branch.
To add CI to our project, we can use GitHub Actions.
We can create the following file: .github/workflows/ci.yml
With the following content:
name: CI
on:
  push:
    branches:
      - main
  pull_request:
jobs:
  test:
    runs-on: ubuntu-latest
    steps:
      - uses: actions/checkout@v4
      - uses: actions/setup-java@v4
        with:
          distribution: temurin
          java-version: 21
          cache: gradle
      - name: Build code and run tests
        run: ./gradlew clean build
Now on every pull request and merge to main, the following will automatically run:
- Compilation
- Unit tests
- Integration tests
This gives immediate feedback if pushed code is breaking our tests.
Deploying to Render
Now we have some form of CI/CD setup, the next step is to deploy our application to the internet. For our application we will be using Render.
Render offers us:
- A free tier plan
- A managed PostgreSQL database
- Automatic deployments from GitHub
- Docker support
We'll use Render because it removes a huge amount of infrastructure complexity.
Before starting, you'll need to connect your GitHub to Render. As mentioned in the previous post, Dockerizing Your Application, ideally you can fork the spring-crud-postgres-example repo and then do the Render deployment using your own account.
Create a Managed PostgreSQL Database
Once you've signed up to Render, we need to first add our PostgreSQL database. Once created, Render will generate credentials, a host, a port and database name which we can then set in our environment variables and secrets later on. The database needs to be there first so when our application loads it can connect to a database.
NOTE: outside of this demo project, using root username and password authentication is insecure when accessing a database. Instead, you should use a service role through Role-Based Access Control (RBAC) rather than individual accounts. These roles allow server to database communication through a role, rather than username and password auth. The roles can also be configured to have specific permissions e.g. only allow read on this one database table
In Render, we first need to select the option to create a new Postgres database like so:
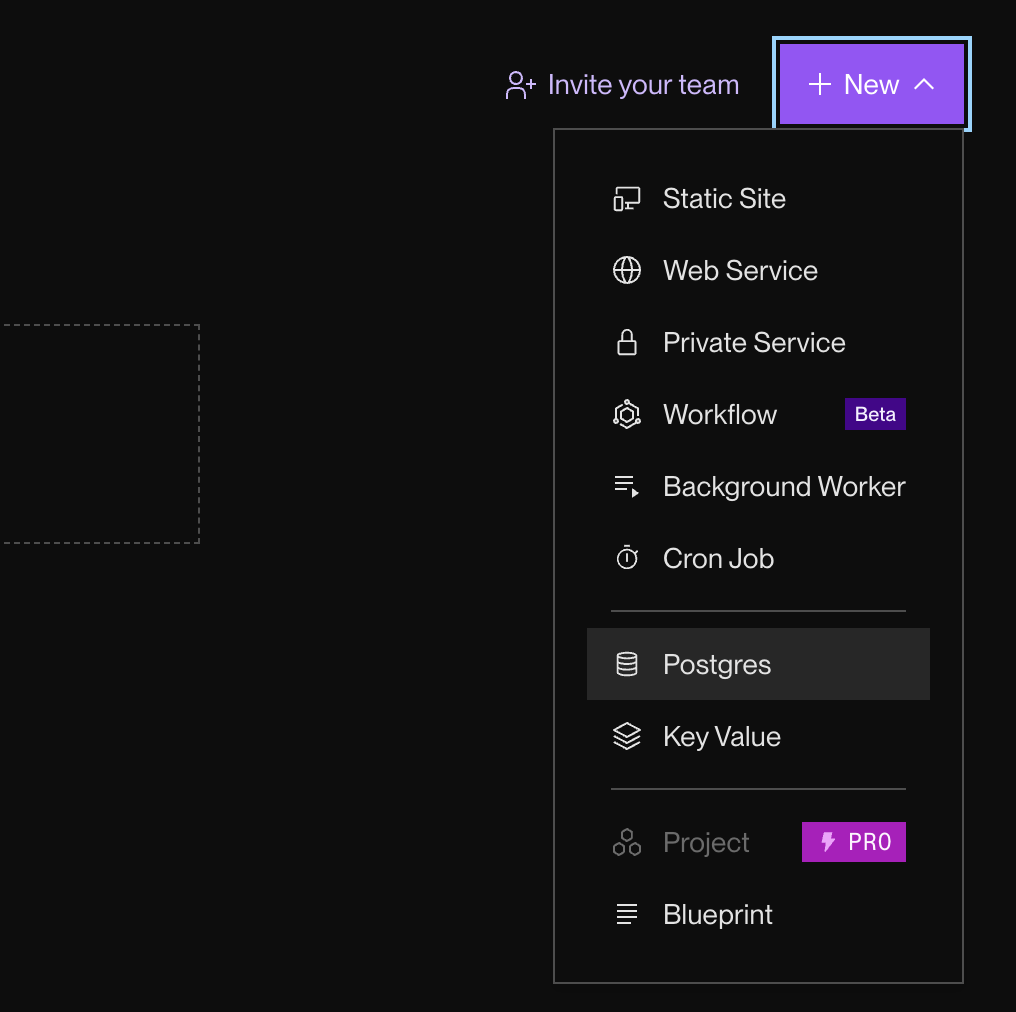
Once you've selected to create a new Postgres database, we need to fill out the following details:
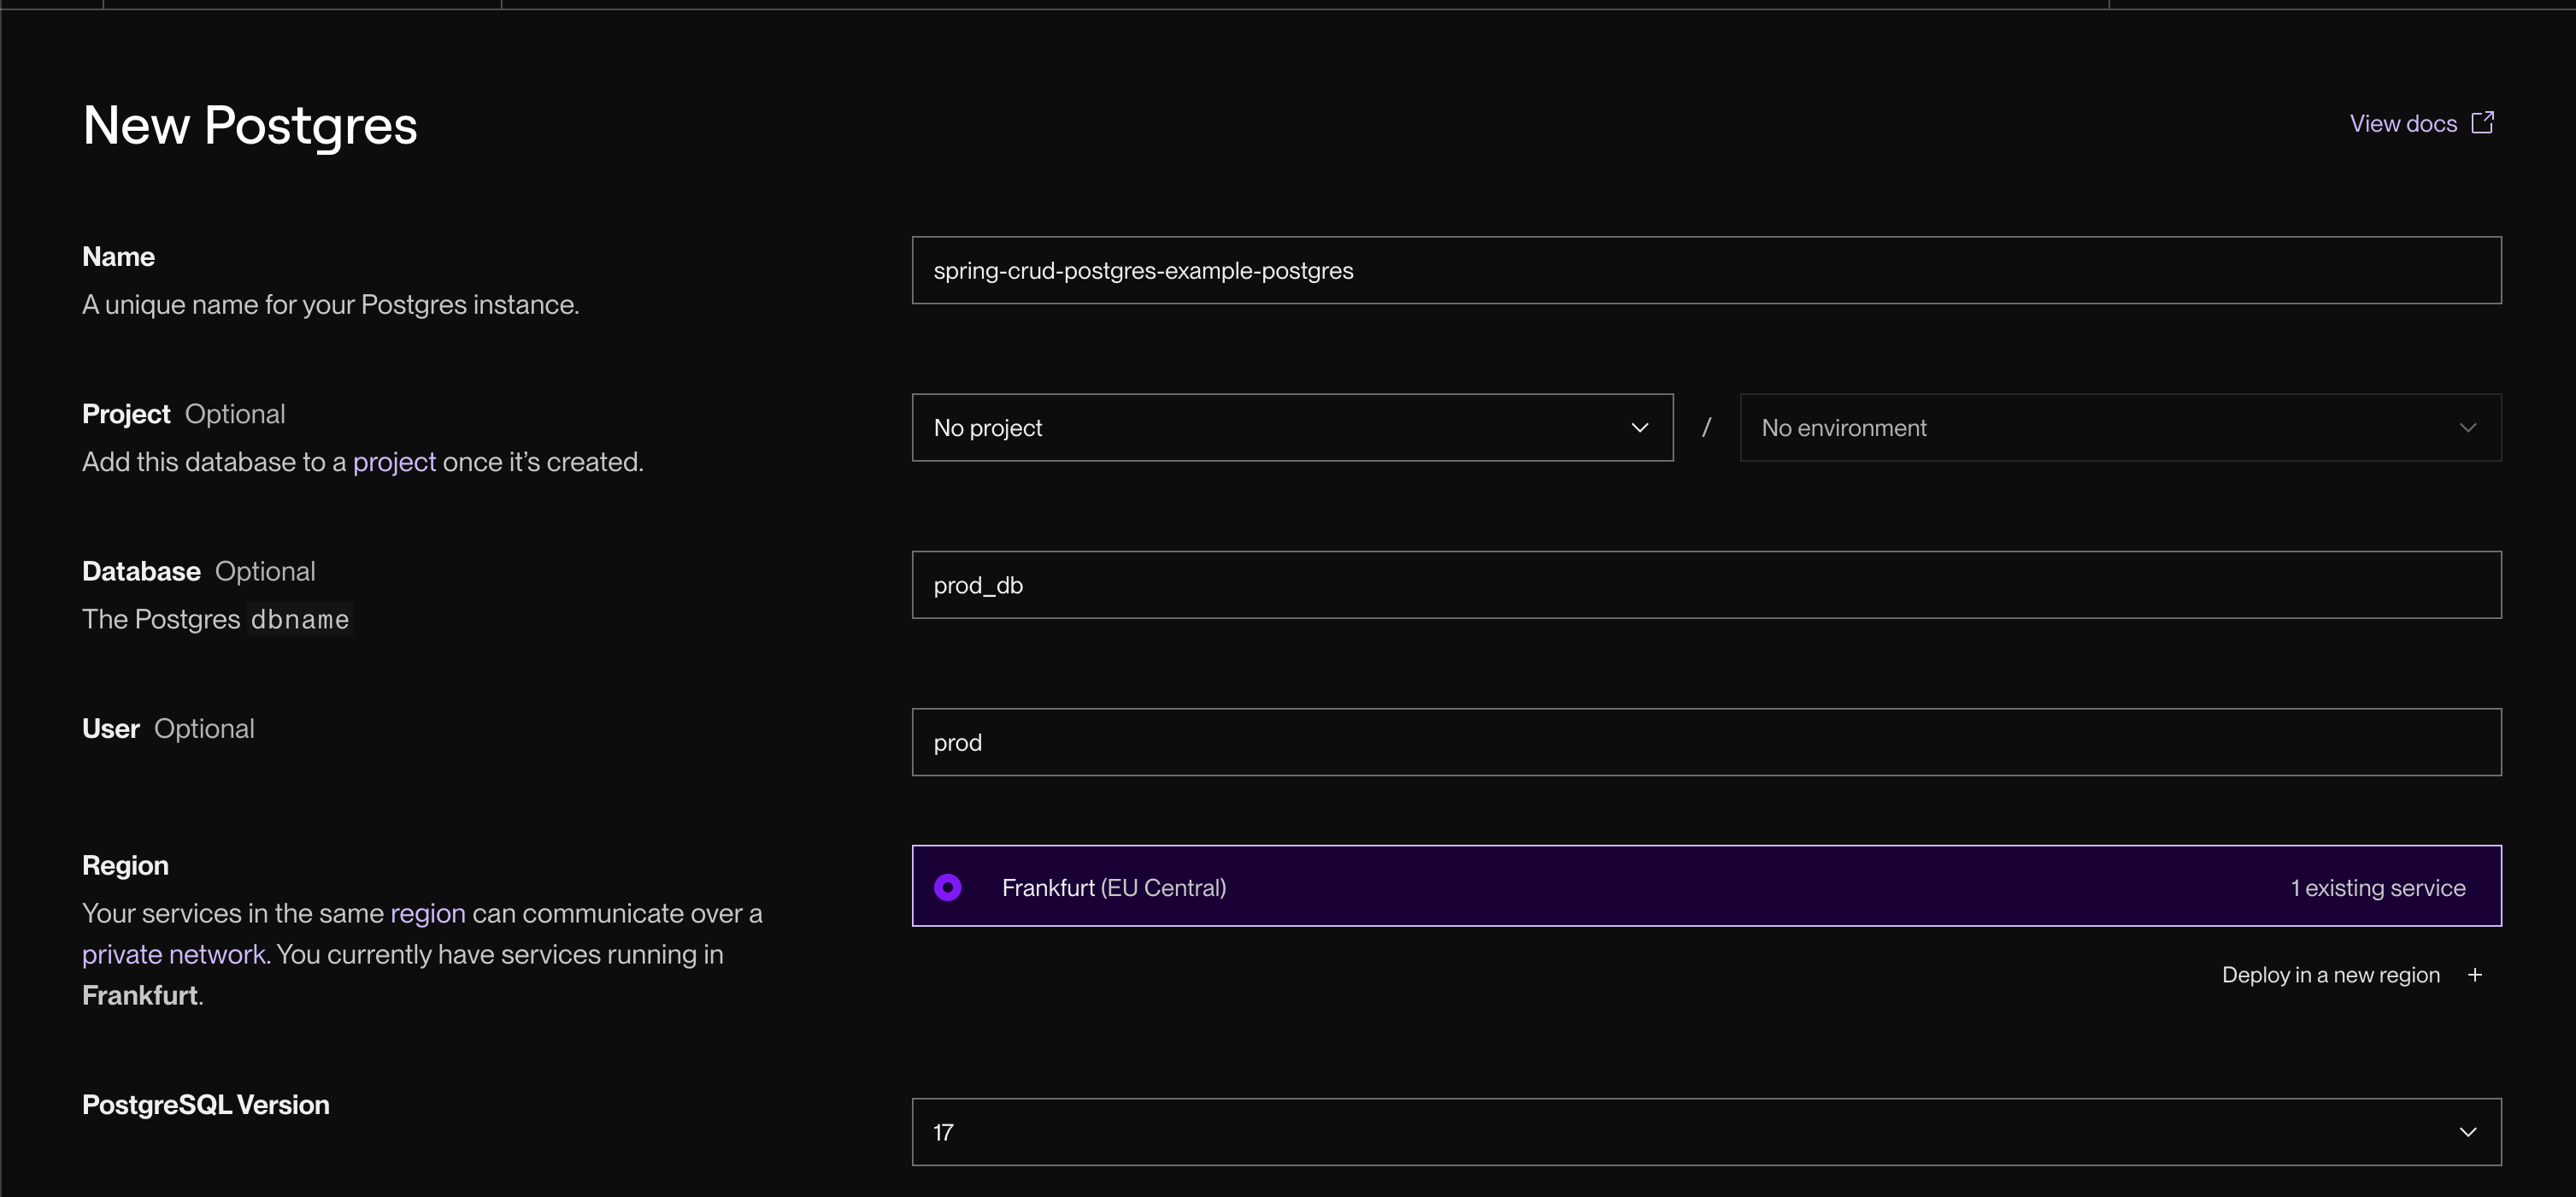
NOTE: you do not have to have the same details as this example, if you do change them just remember to replace any parts of the example details. E.g. if you have a different database name, make sure to not use prod_db in the connection string.
Then choose the free tier, unless you want to pay. For this demo the free tier should be more than enough.
Finally, click "Create Database"! This will take anywhere from 2-4 minutes to create our Postgres database.
Once created, you should get a dashboard showing various information about your new Postgres database. There's an "Info" tab which when navigated to shows all the details of your new postgres instance. As you scroll down the "Info" page, there will be a "Connections" section on the info page showing various generated details like the Hostname, Port, Database, Username & Password. Remember this section as we will need it when filling in our environment variables for our web service.
Multi-Stage Dockerfile for Render
Our first Dockerfile copied a JAR that we built locally. That was useful for learning the basic structure of a Dockerfile. However, if we want to deploy our application to Render, the Docker image will need to be buildable directly from the source repository. This is because Render clones the repository and runs the Docker file, but it doesn't run Gradle to build our application. Therefore, if we used our current Dockerfile, the COPY command will fail as no Jar exists in the Render deployment job. We can therefore update our Dockerfile to use a multi-stage build like so:
FROM eclipse-temurin:21-jdk AS builder

WORKDIR /app
COPY . .
RUN ./gradlew build -x test

FROM eclipse-temurin:21-jre
WORKDIR /app

COPY --from=builder /app/build/libs/crud.app-0.0.1-SNAPSHOT.jar app.jar

EXPOSE 8080
ENTRYPOINT ["java", "-jar", "app.jar"]
This will now run Gradle in Docker to build our application Jar, then copy that Jar into a lightweight JRE image to run our Java application.
Create a Web Service
Now we have our Postgres database up and running along with our multi-stage Dockerfile, we can now create a new web service in Render. To do this, on the Render dashboard select the option to create a new web service like so:
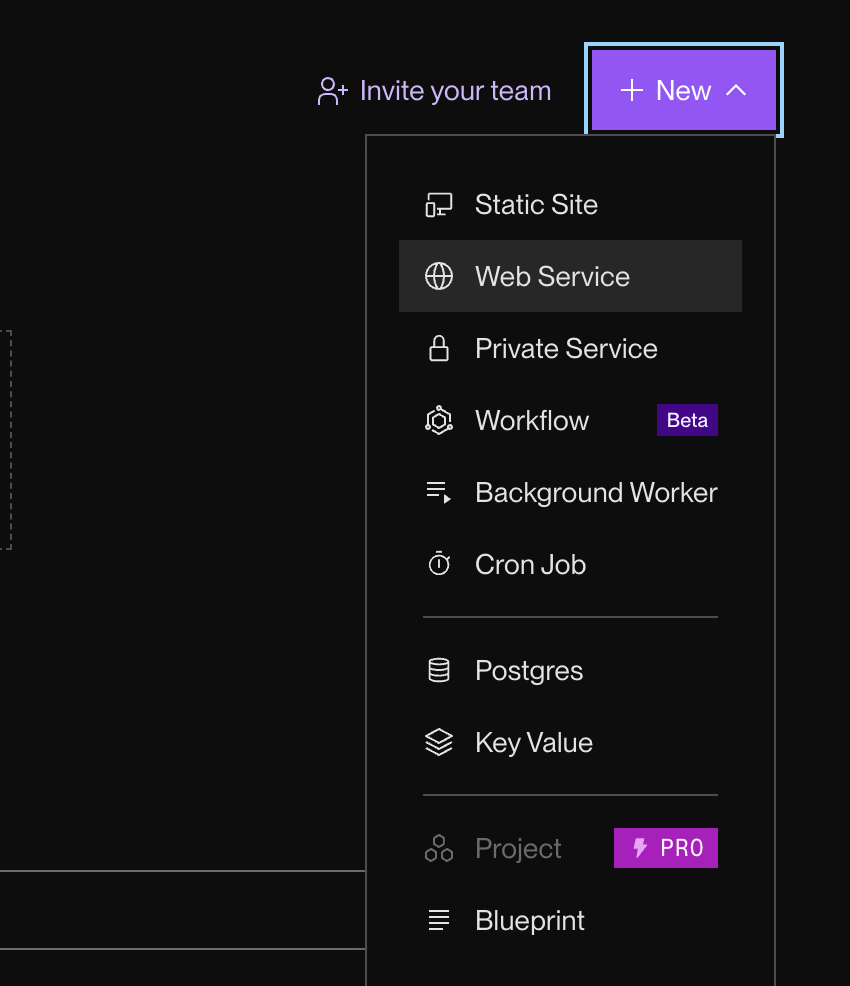
As previously mentioned, for this to work you'll need to connect your own personal GitHub account and fork the spring-crud-postgres-example repo. If you've done this correctly, you should see the option to select the repo in Render:

Once the repo is selected, we will need to set the following options for our new web service:
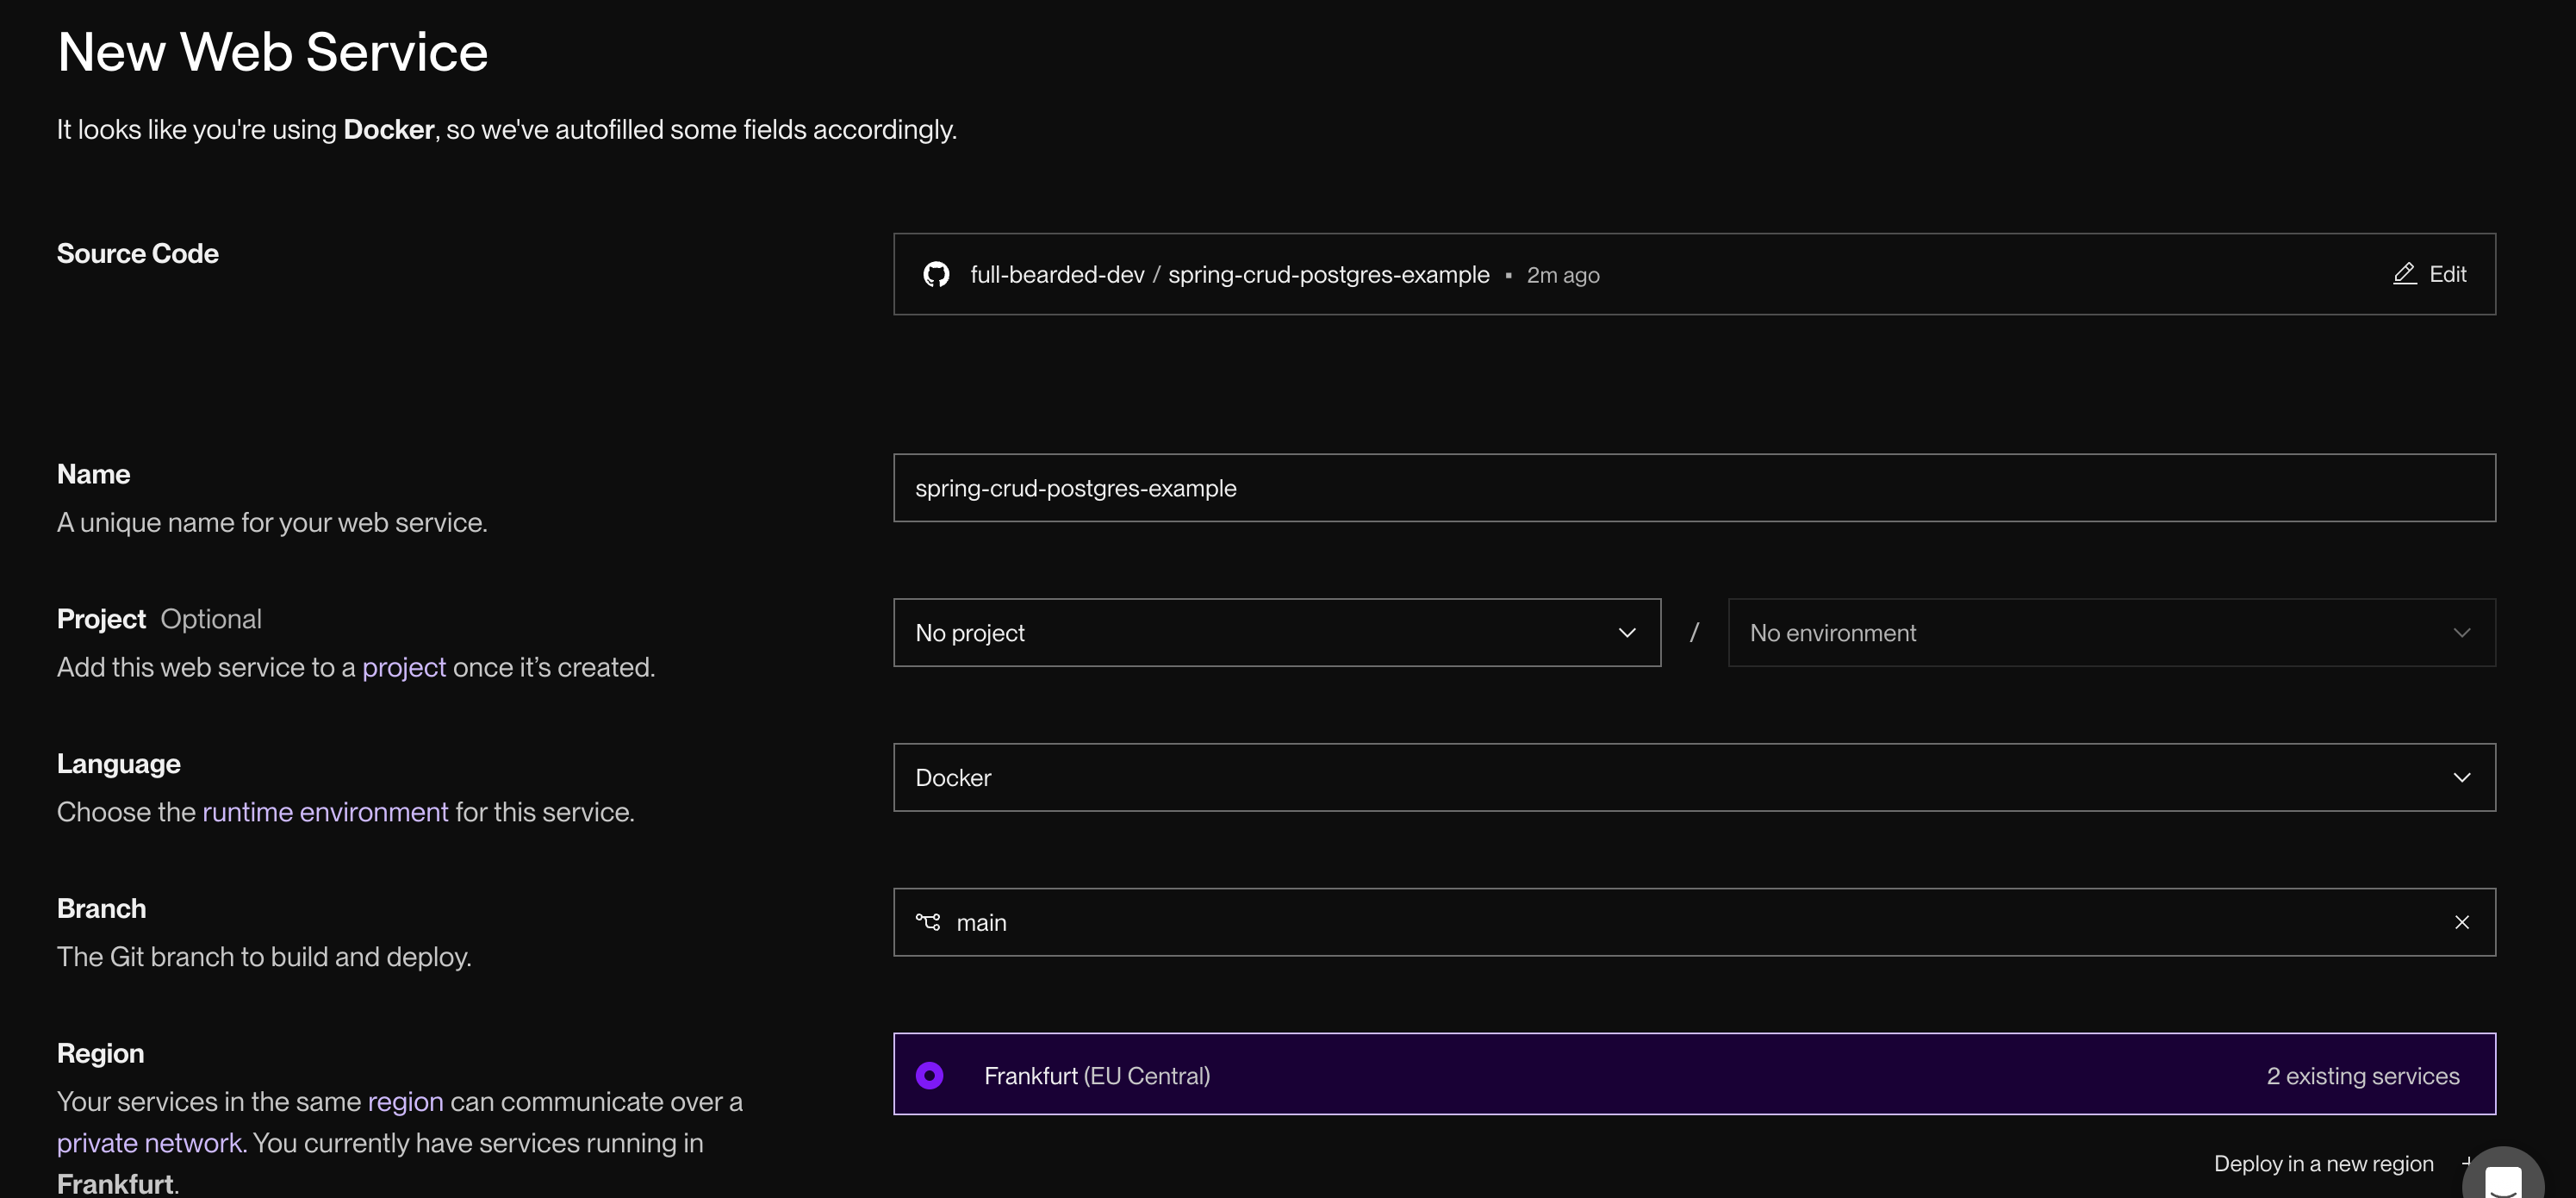
Like in the Adding Docker Compose section, we will also need to set our environment variables for our application like so:
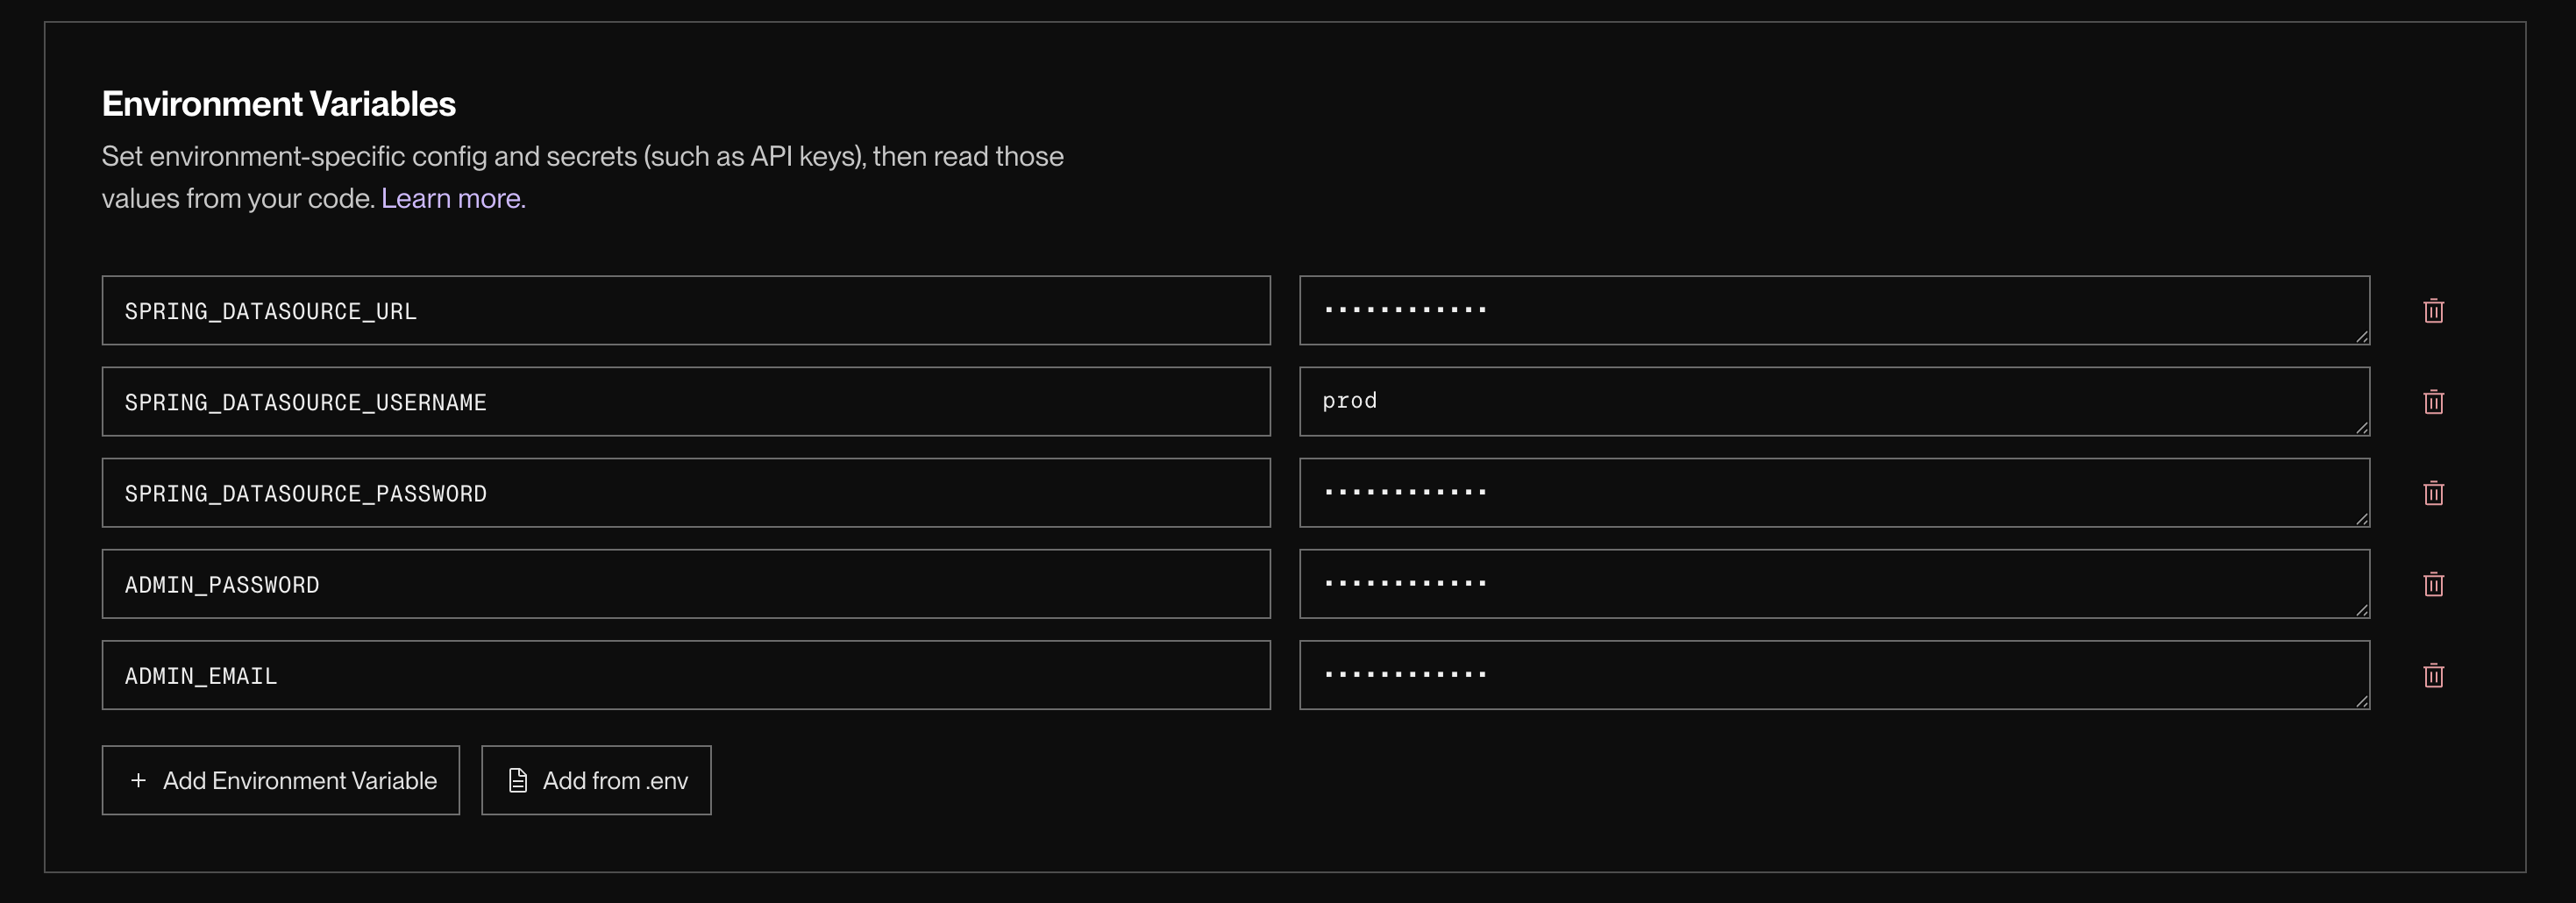
The environment variable values should be as followed:
SPRING_DATASOURCE_URL-jdbc:postgresql://<Hostname>/<Database>, "Hostname" and "Database" can be found in the "Connections" section on Render for Postgres databaseSPRING_DATASOURCE_USERNAME- Username from "Connections" section on Render for Postgres database, in this example it'sprodSPRING_DATASOURCE_PASSWORD- Password from "Connections" section on RenderADMIN_PASSWORD- Whatever you want, remember this for later, e.g.supersecureADMIN_EMAIL- Whatever you want it to be, e.g.admin@example.com
After setting the environment variables, Select the free tier version for our web service. Again, we don't need a paid version for this demo.
Finally, once everything is set, click the "Deploy Web Service" button. This should deploy our web service and show a screen like so:
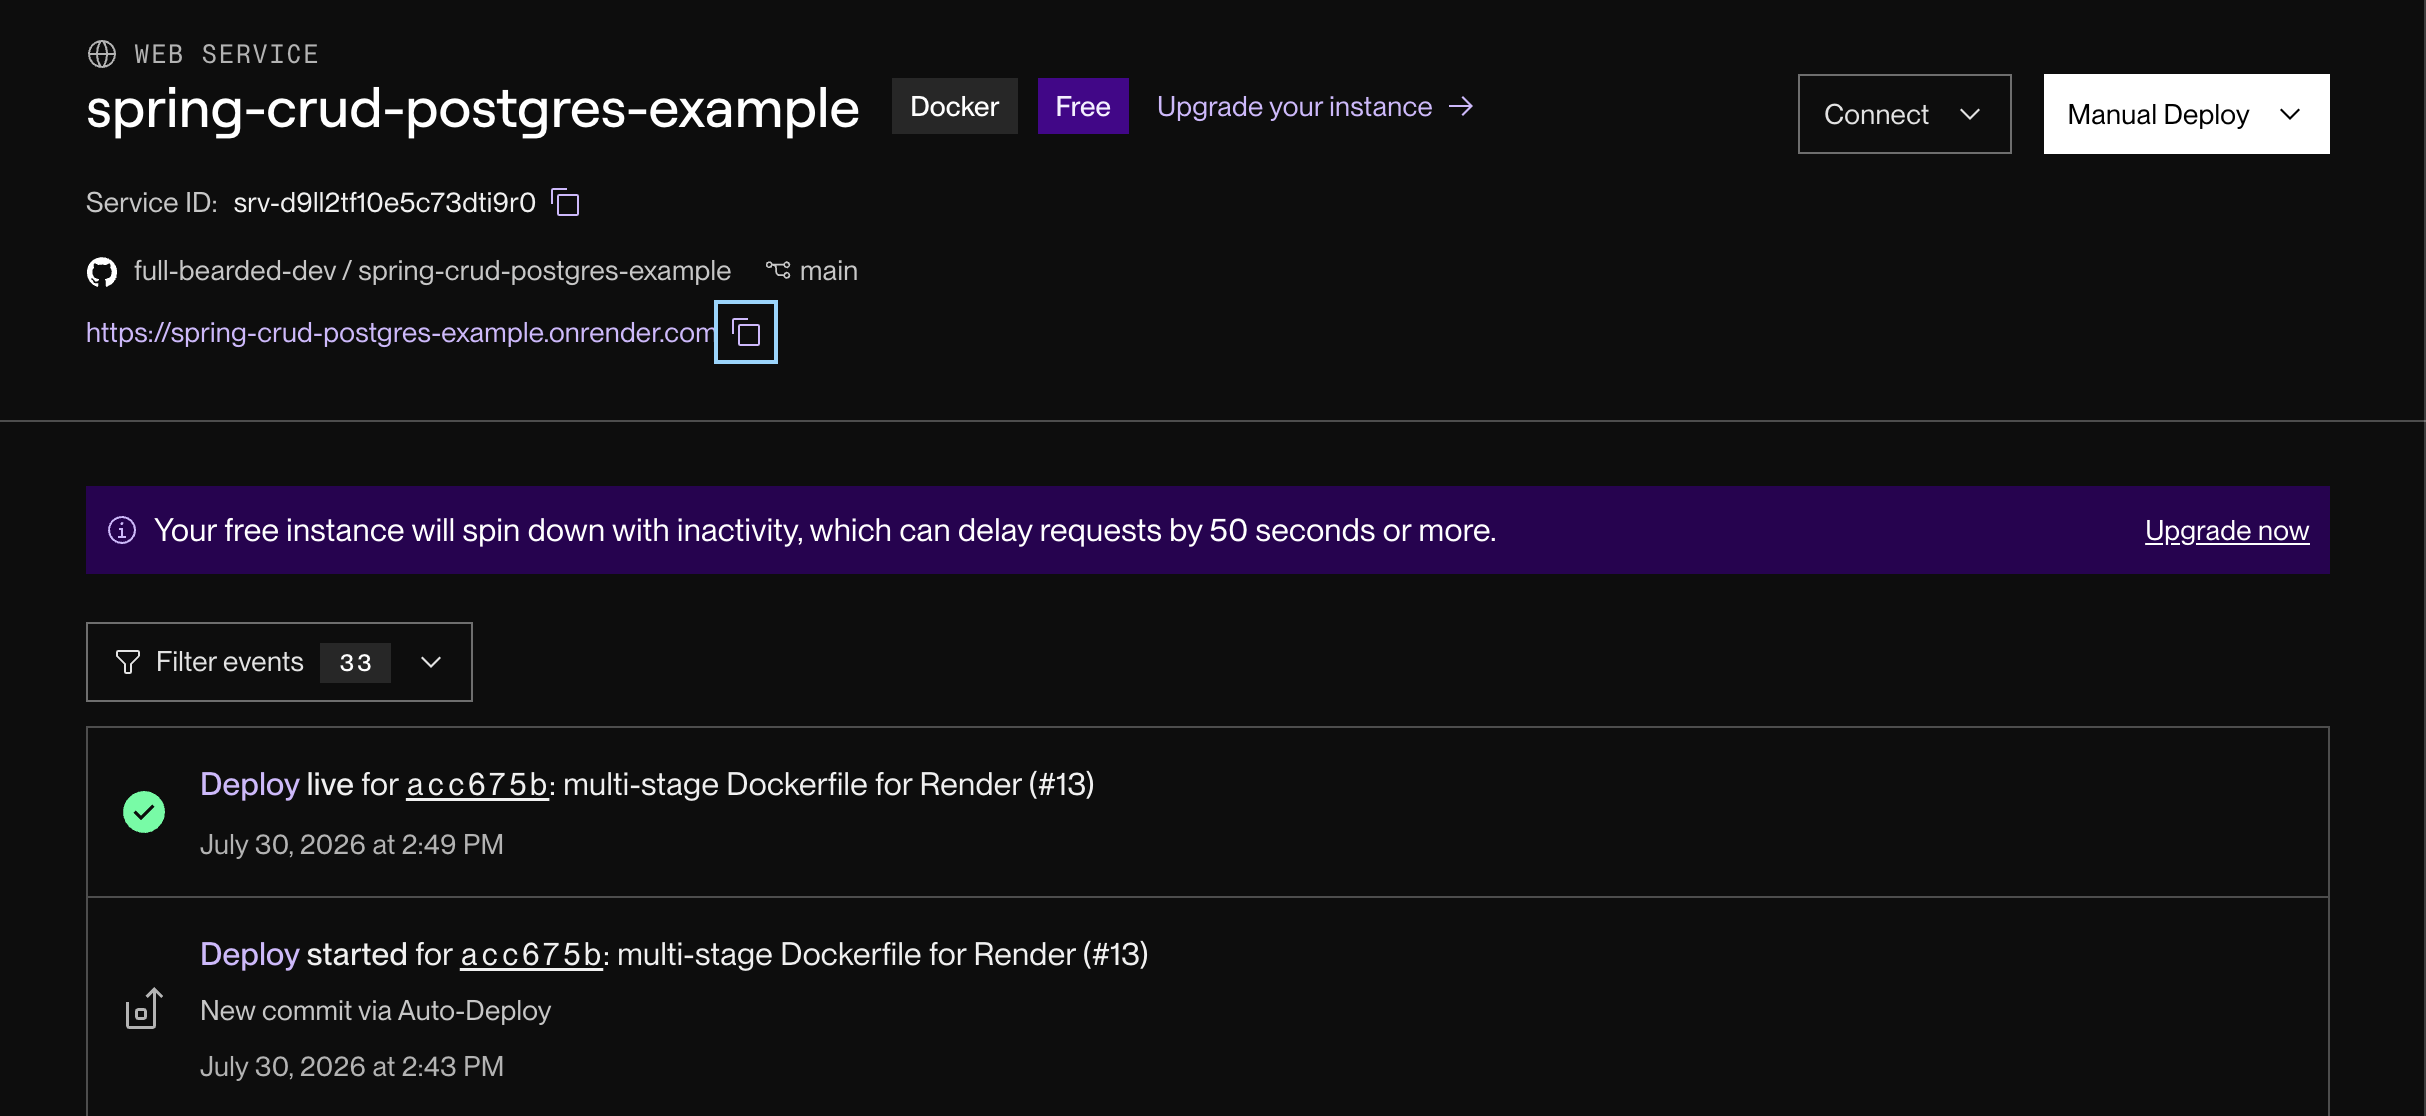
The first time this app deploys, it could take anywhere up to 5-10 minutes.
Once you get a green tick, your application should be deployed.
We can test this by using the https link at the top of the events page, in this example the link is https://spring-crud-postgres-example.onrender.com. However, this will probably be different for your application.
As shown below, accessing this link prompts us with the basic authentication we set up in a previous blog:
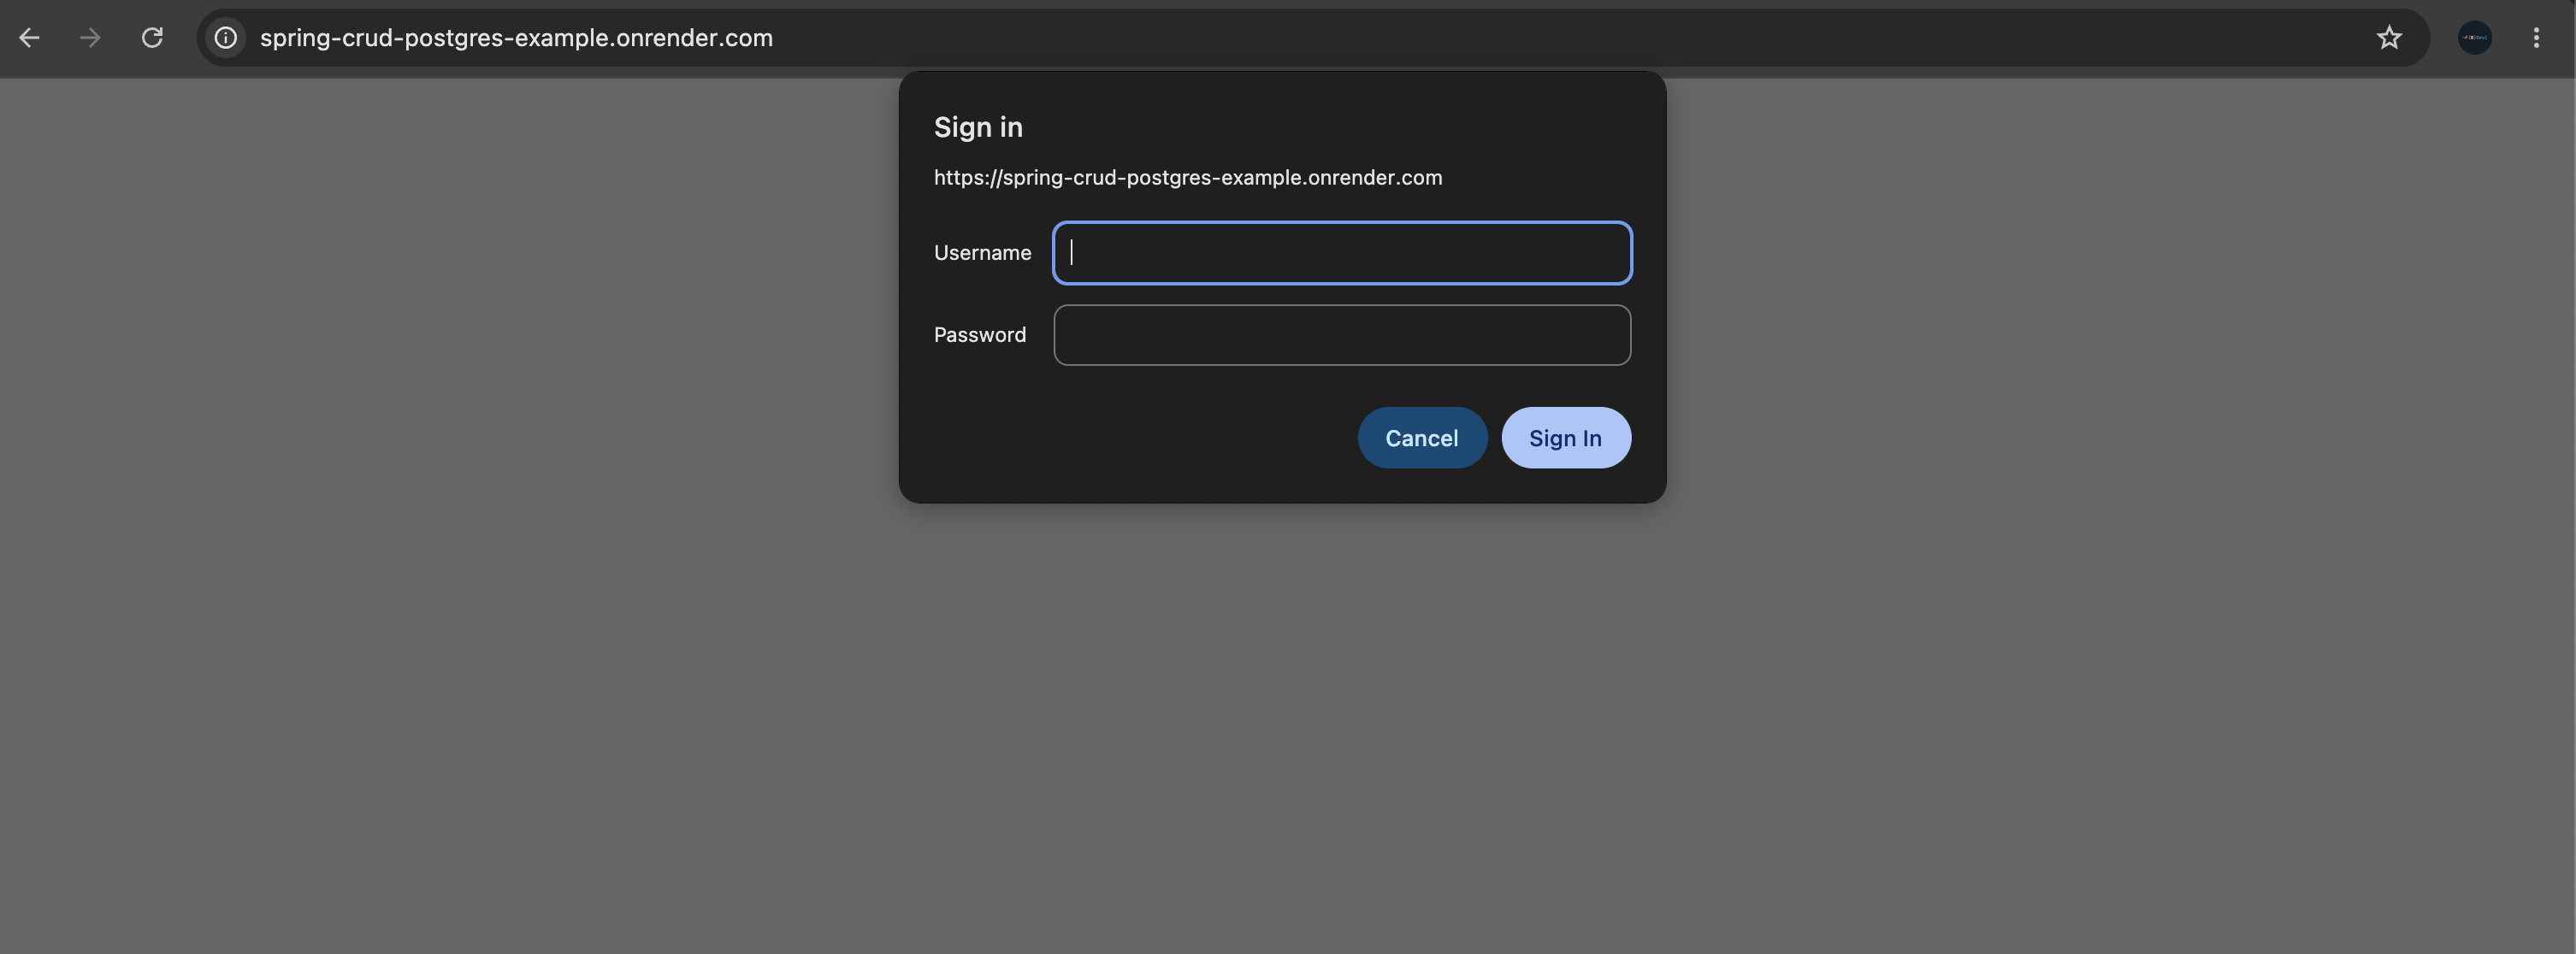
You can enter the admin credentials using whatever you set the ADMIN_PASSWORD to, in this case it would be username: admin, password: supersecure.
You should now be able to access the users API endpoint like so:

We should also be able to access the Swagger docs:
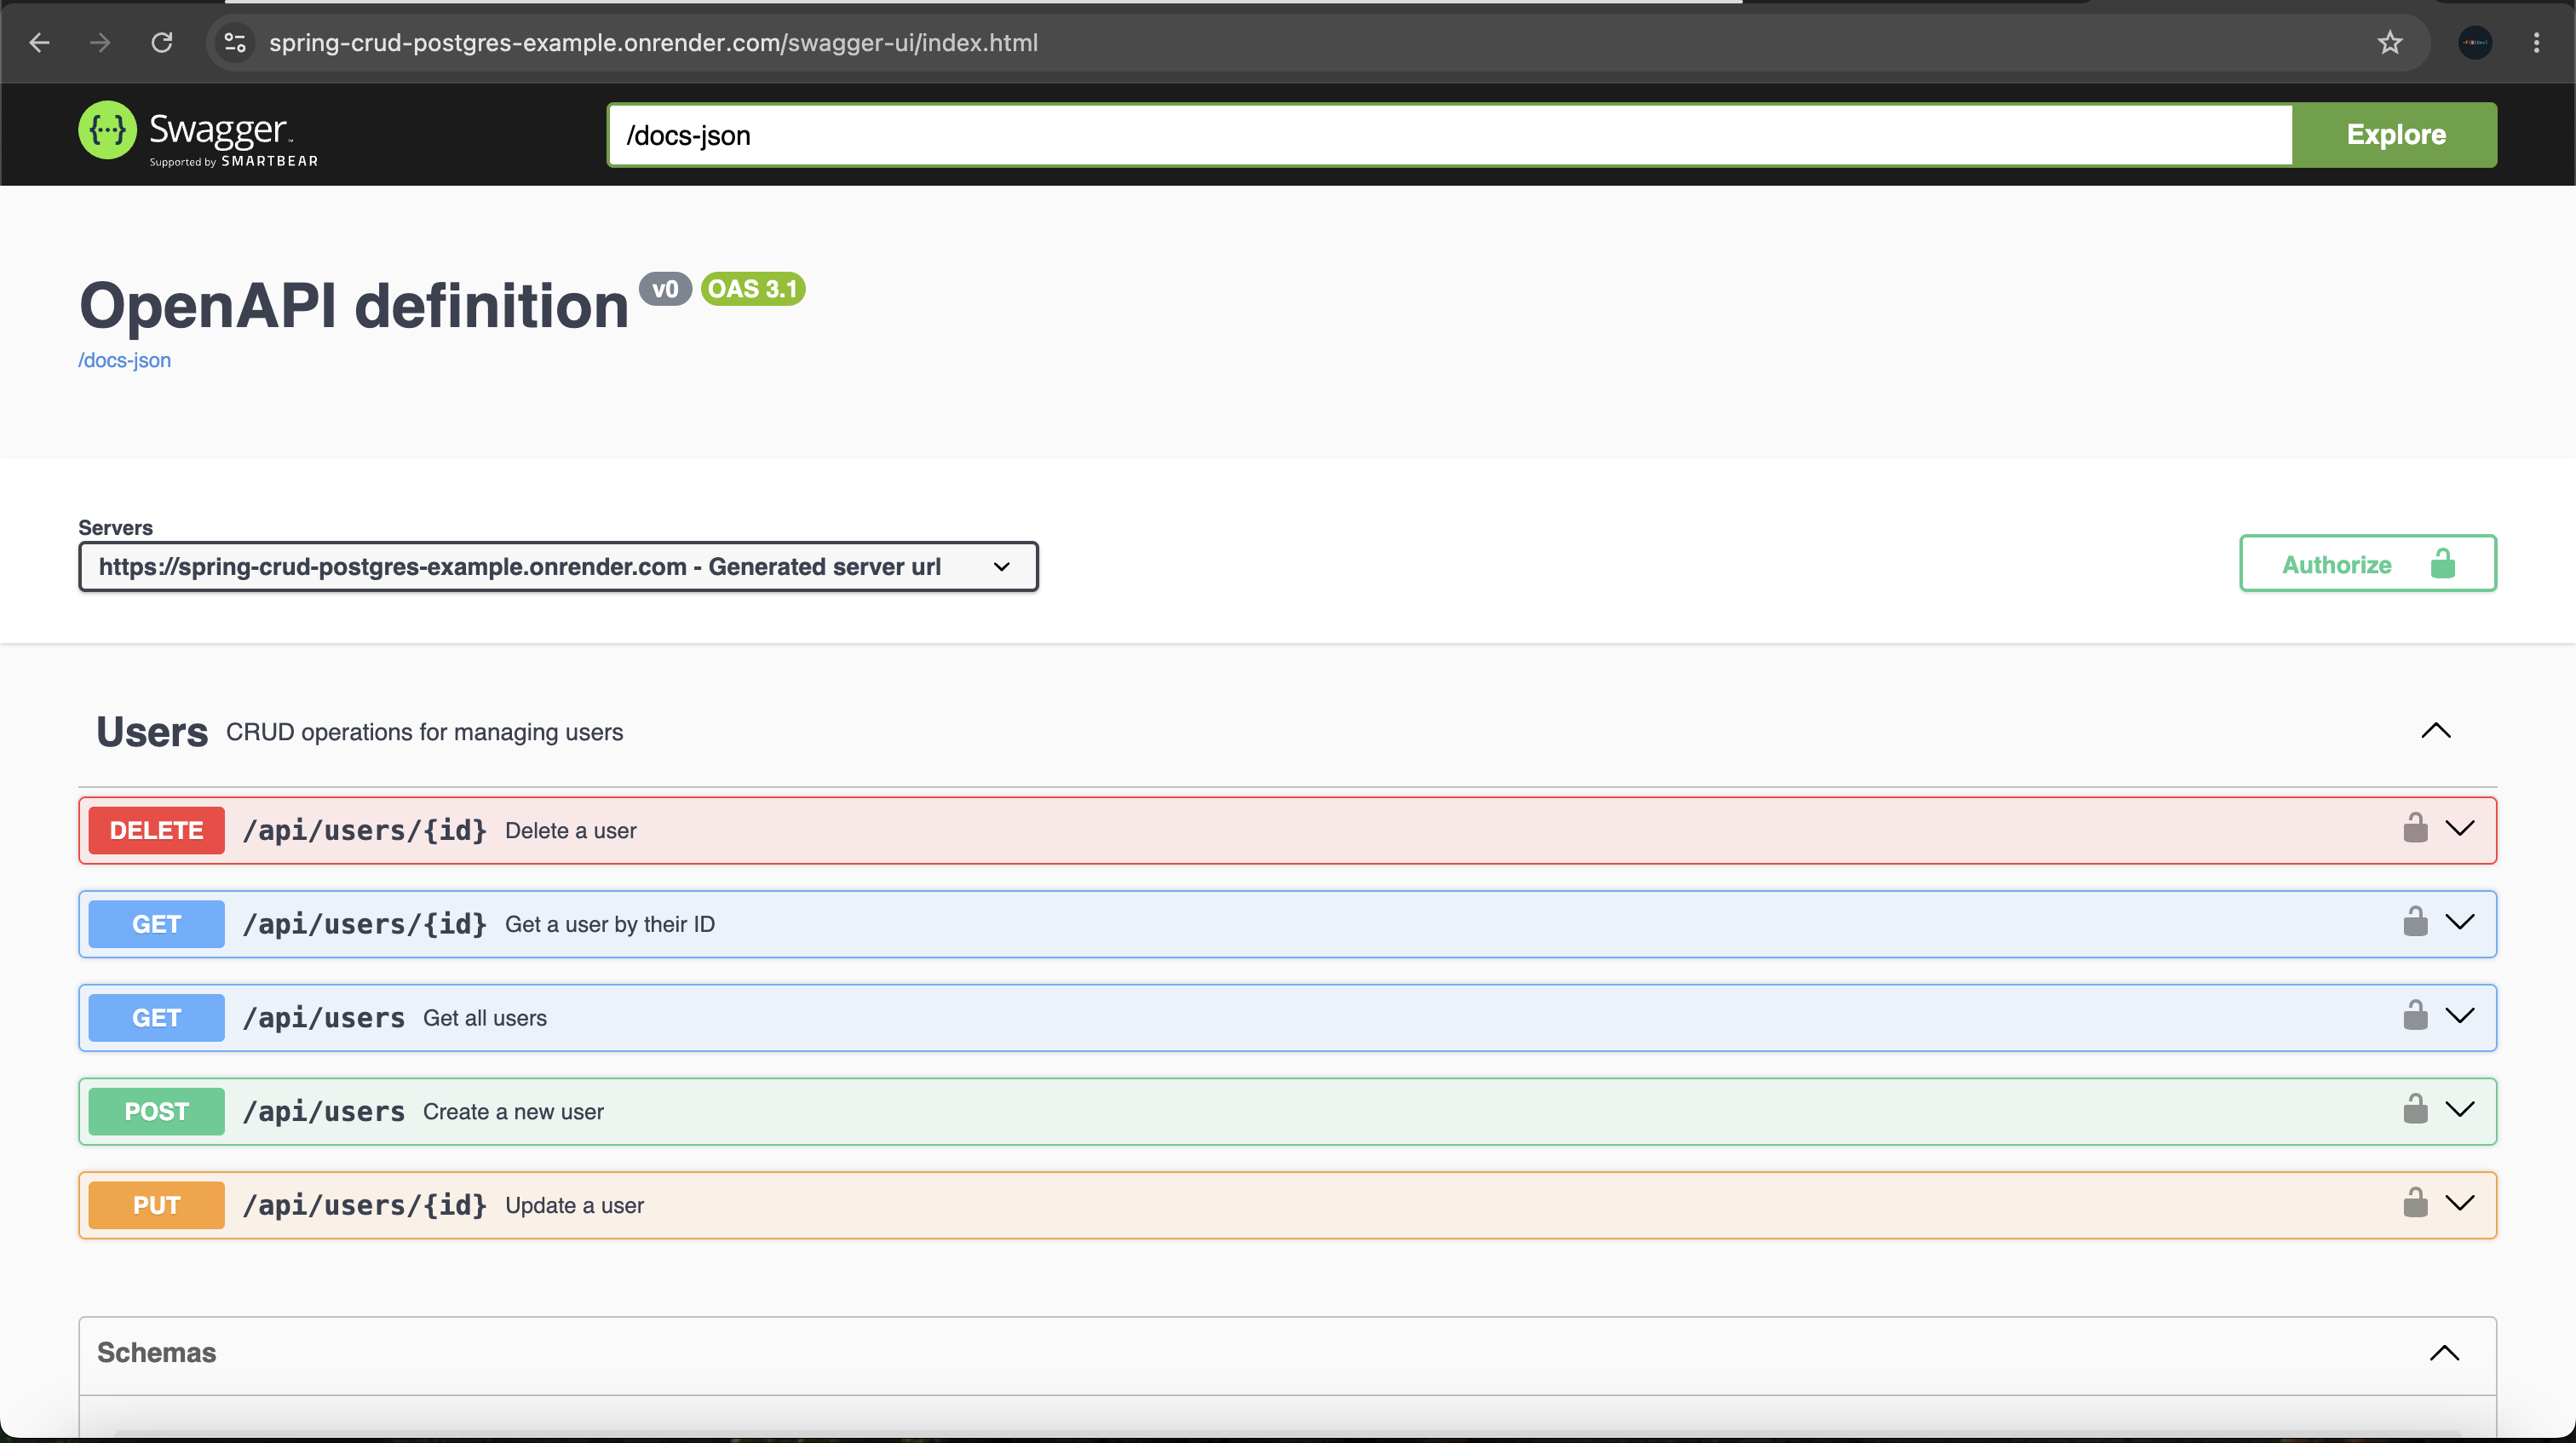
And that's it! We've deployed our application to Render and can access it from anywhere on the web!
NOTE: Once you have confirmed that the deployment works, consider disabling Auto-Deploy in Render. This prevents future commits to the linked branch from immediately changing the live application. You can still deploy a selected version manually through the Render dashboard.
Why This Is Demo Grade and Not Production Grade
Now before you get carried away and start deploying everything like this, just remember this was more for demo purposes. If this was to be a true production application, there would be a lot more to consider and implement. I thought I would just mention some additions that would shift this application from demo grade to production grade.
Multiple Application Instances
Right now we only have one application instance. This would mean downtime during deployments or single instance failure. We could use a technology like Kubernetes for container orchestration, ensuring we have higher availability.
Secrets Management
In this demo we passed secrets like passwords through environment variables. This isn't too bad in Render as the variables are hidden from view. However, this is not best practice. Instead, production grade systems use dedicated secret managers for providing secret values to applications.
Monitoring
Right now we have very limited monitoring. We have some rough network metrics and logs provided to us by Render. However, in a production environment we would need: metrics, logging, alerting, tracing. This will help us monitor and debug any issues within our production environment.
Backups
Alongside use RBAC for service-to-database connections, databases should also have automated backup strategies to ensure data isn't lost and is recoverable from failure.
Security
Right now the only security we have is at the application layer using basic authentication. However, we could enforce security at other layers and include security features such as: HTTPS certificates, rate limiting, web application firewalls WAFs and network policies.
Deployment Strategies
Our current deployment strategy is to just deploy straight to production once we commit some code to the main branch in the GitHub repo. However, this might be quite disruptive to any of our production users and also isn't very safe to do if things go wrong with the application. Instead, we can use strategies like: blue/green deployments, canary releases and rolling deployments to deploy our applications in a safer, more controller manner.
Infrastructure as Code
Lastly, our infrastructure (database and web service) is manually configured and deployed. This could lead to inconsistent configuration and deployments, potentially breaking our application. Using infrastructure as code (IaC) tools like Terraform can help mitigate these issues and ensure more consistent deployments.
What's Next?
So to recap we learnt:
- All about Docker compose, what is it, why use it and how to configure it
- How to deploy our application to the internet using CI/CD and Render
- How our demo application deployment differs to a real production application
GitHub Example for CI/CD & Docker Compose
GitHub Example for Multi-stage Dockerfile for Render
Wrapping Up
Congratulations on making it to the end of the series!
We started with an empty Spring Boot project and, step by step, built a complete CRUD application featuring a REST API, PostgreSQL persistence, authentication, automated testing, database migrations with Liquibase, Docker containerisation, continuous integration, and finally a live cloud deployment.
While this application is intentionally simple, the technologies, tools, and development practices we've used are the same foundations you'll find in many real-world Spring Boot applications.
I hope this series has given you the confidence to start building your own projects and continue exploring the Spring ecosystem. Thanks for following along, and happy coding!
Side note: If you liked this blog series and want some more great content, you can check out more blog posts here.