API Documentation with Swagger and OpenAPI
This post links to: Building a Spring Boot CRUD App With Postgres from Scratch: The Complete Guide.
This guide follows on from Testing APIs in Spring Boot.
In this post, we’ll add some Swagger documentation to our Spring Boot app using Springdoc OpenAPI to help inform users how to interact with our API. We’ll walk through the setup of Swagger, how to annotate our endpoints and models, and how to customise the Swagger UI.
What is Swagger
Swagger is an open-source framework for designing, building, documenting, and consuming RESTful APIs. It provides a standard way to describe your API using the OpenAPI Specification.
The OpenAPI Specification is a language-agnostic standard for describing REST APIs. It’s essentially a structured .json or .yaml file that describes the following:
- Available endpoints (
/users,/products, etc.) - HTTP methods (
GET,POST,PUT,DELETE) - Request/response payloads (what data to send/receive)
- Response codes (e.g.
200 OK,404 Not Found) - Security/auth mechanisms (e.g.
JWT,OAuth)
The Swagger tools work with the OpenAPI spec to generate documentation, client SDKs, test UIs, and more.
How Swagger Works
- Firstly, you'll need an application that defines
RESTendpoints. InJava/Springthis would include using annotations like@RestController,@GetMapping,@PostMappingetc. Luckily, we've already built one! - You can then use Swagger annotations (e.g.
@Operation,@Schema,@ApiResponse) to enrich your API with extra metadata. - Springdoc (the Swagger core library) will scan your annotated code at runtime, automatically generate the OpenAPI JSON spec, and then exposes it at:
/v3/api-docs - The Swagger UI is a web-based UI that can read the automatically generated OpenAPI spec at
/v3/api-docsand can render interactive documentation at:/swagger-ui.html - This allows users to interact with the live API from the browser, send test requests, inspect responses, and understand all available operations.
Why Swagger
So why use Swagger? Well there are few reasons why.
- Automatic Up-To-Date API Docs - instead of manually writing documentation, Swagger automatically generates it for you. Keeping your docs consistent with your API.
- Interactive UI for Testing and Exploration - Swagger UI makes your API become clickable and testable right in the browser. This means faster debugging and testing without the need for separate tools.
- Improves Collaboration Across Teams - Swagger acts as a shared contract between various users such as: Backend and Frontend developers, QA engineers and any other API consumers. It makes working with your API easier and clearer.
- Standardised and Language-Agnostic - Swagger and the OpenAPI spec is widely adopted and supported across many platforms. So whether you’re using:
Java (Spring Boot),Node.js (Express),Python (FastAPI),Go,Rust,.NET, etc. Swagger gives you a unified way to describe your API. - Customisable and Extendable - you can group endpoints by tags, customise parameter descriptions and examples, secure the Swagger UI (e.g. with JWT or Basic Auth) and add your own branding.
TL;DR: Swagger turns your API into a self-explaining, interactive, developer-friendly tool.
Let's get into setting up Swagger for our API!
Setting Up Dependencies
First things first, we're going to need to add the following dependency to our build.grade file.
// build.gradle
dependencies {
    //other deps...
    implementation 'org.springdoc:springdoc-openapi-starter-webmvc-ui:2.8.5'
    // other deps...
}
Viewing the Swagger UI
Now we've added our dependency, that should be it in terms of the minimal amount of setup needed for Swagger.
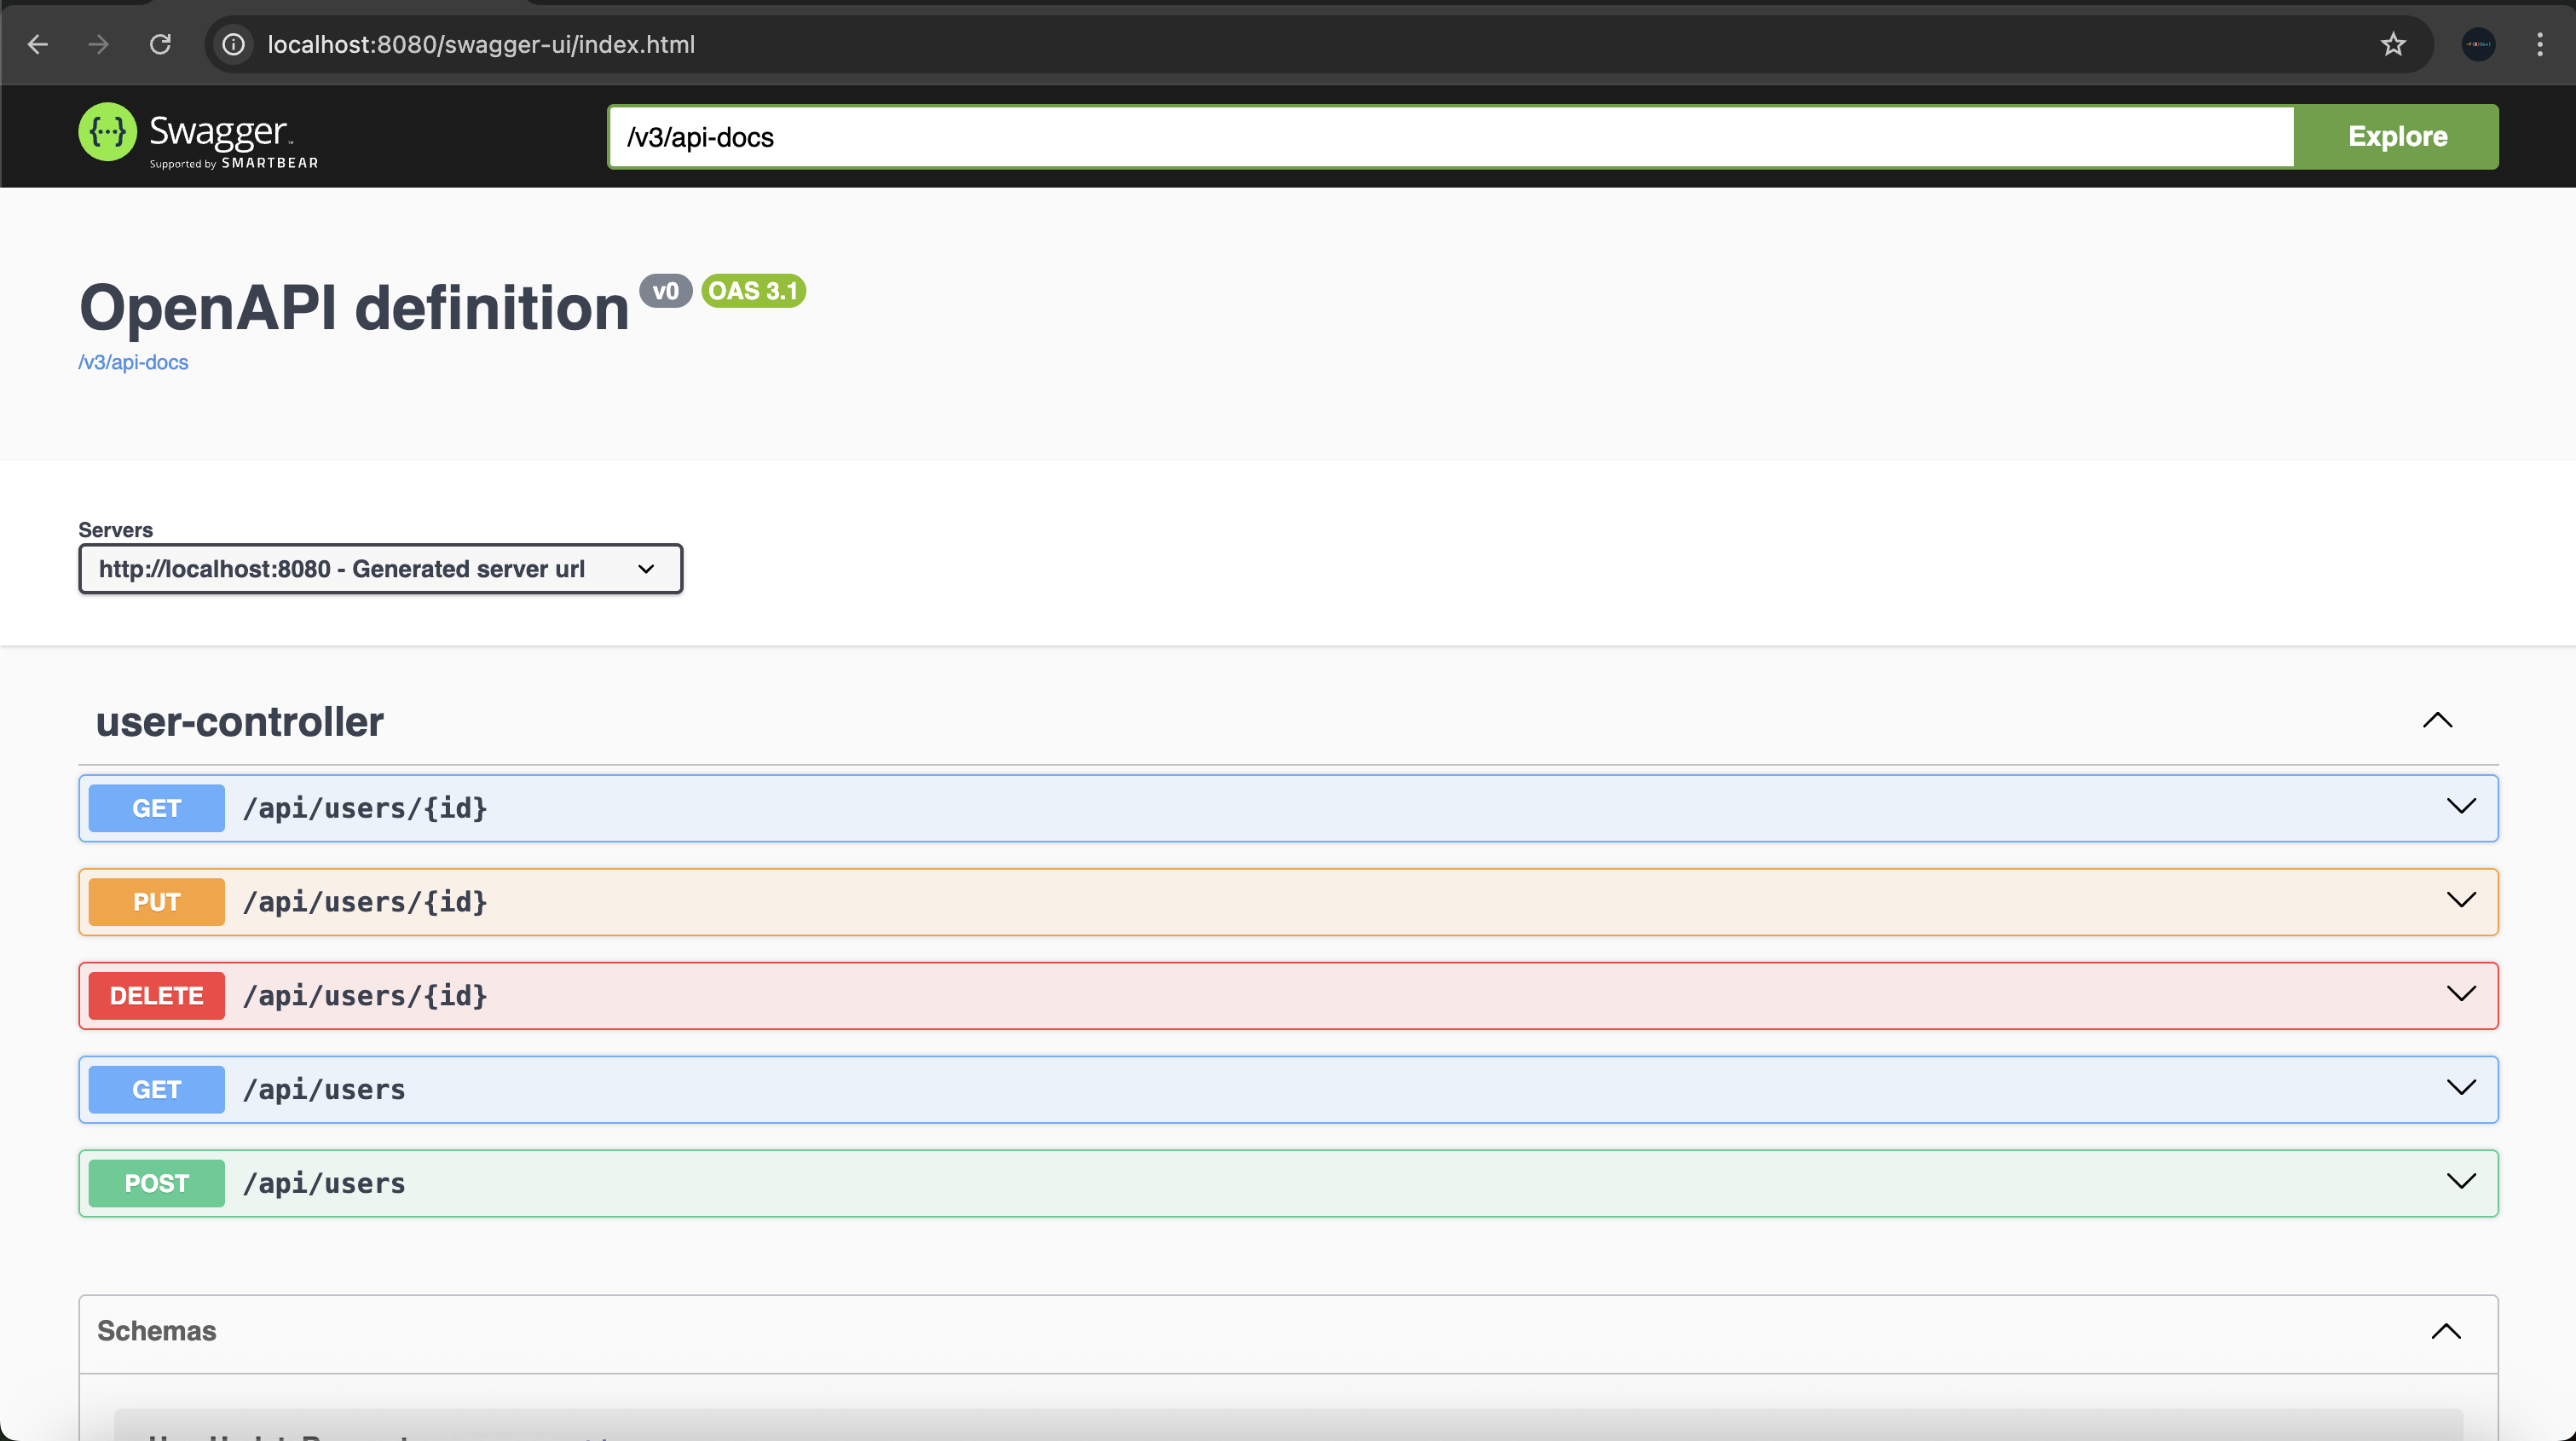
We can run our application and view our automatically generated Swagger UI page by visiting the following URL: http://localhost:8080/swagger-ui/index.html
You should see something similar to this:
We can also view the raw OpenAPI JSON used to populate the Swagger UI by visiting: http://localhost:8080/v3/api-docs
It's as easy as that!
Swagger Annotations
We can use various Swagger annotations to customise the Swagger UI and provide our API users with more detailed information.
Swagger Controller Annotations
We can start with some basic annotations for our controller:
@Operation: Adds a summary/description to endpoints@Parameter: Adds metadata to method params@ApiResponse: Documents success/error responses@Tag: Groups endpoints together
Here's a full example of applying the Swagger annotations to the UserController
// UserController.java
@RestController
@RequestMapping("/api/users")
@Tag(name = "Users", description = "CRUD operations for managing users")
public class UserController {

    //...dependencies

    @Operation(summary = "Get all users", description = "Returns a list of all users stored in the database")
    @ApiResponse(responseCode = "200", description = "List of users returned successfully")
    @GetMapping
    public List<UserResponse> getAllUsers() {
        //...logic
    }

    @Operation(summary = "Get a user by their ID", description = "Returns a user with the specified ID")
    @ApiResponses({
            @ApiResponse(responseCode = "200", description = "User found and returned"),
            @ApiResponse(responseCode = "404", description = "User not found")
    })
    @GetMapping("/{id}")
    public UserResponse getUserById(@PathVariable("id") final Long id) {
        //...logic
    }

    @Operation(summary = "Create a new user", description = "Creates and returns the newly created user")
    @ApiResponses({
            @ApiResponse(responseCode = "200", description = "User created successfully"),
            @ApiResponse(responseCode = "400", description = "Invalid request data")
    })
    @PostMapping
    public UserResponse createUser(@Valid @RequestBody final UserCreateRequest user) {
        //...logic
    }

    @Operation(summary = "Update a user", description = "Updates a user by ID with the provided data")
    @ApiResponses({
            @ApiResponse(responseCode = "200", description = "User updated successfully"),
            @ApiResponse(responseCode = "404", description = "User not found"),
            @ApiResponse(responseCode = "400", description = "Invalid request data")
    })
    @PutMapping("/{id}")
    public UserResponse updateUser(@PathVariable("id") final Long id,
                                   @Valid @RequestBody final UserUpdateRequest updatedUser) {
        //...logic
    }

    @Operation(summary = "Delete a user", description = "Deletes a user by ID")
    @ApiResponses({
            @ApiResponse(responseCode = "200", description = "User deleted successfully"),
            @ApiResponse(responseCode = "404", description = "User not found")
    })
    @DeleteMapping("/{id}")
    public void deleteUser(@PathVariable("id") final Long id) {
        //...logic
    }
}
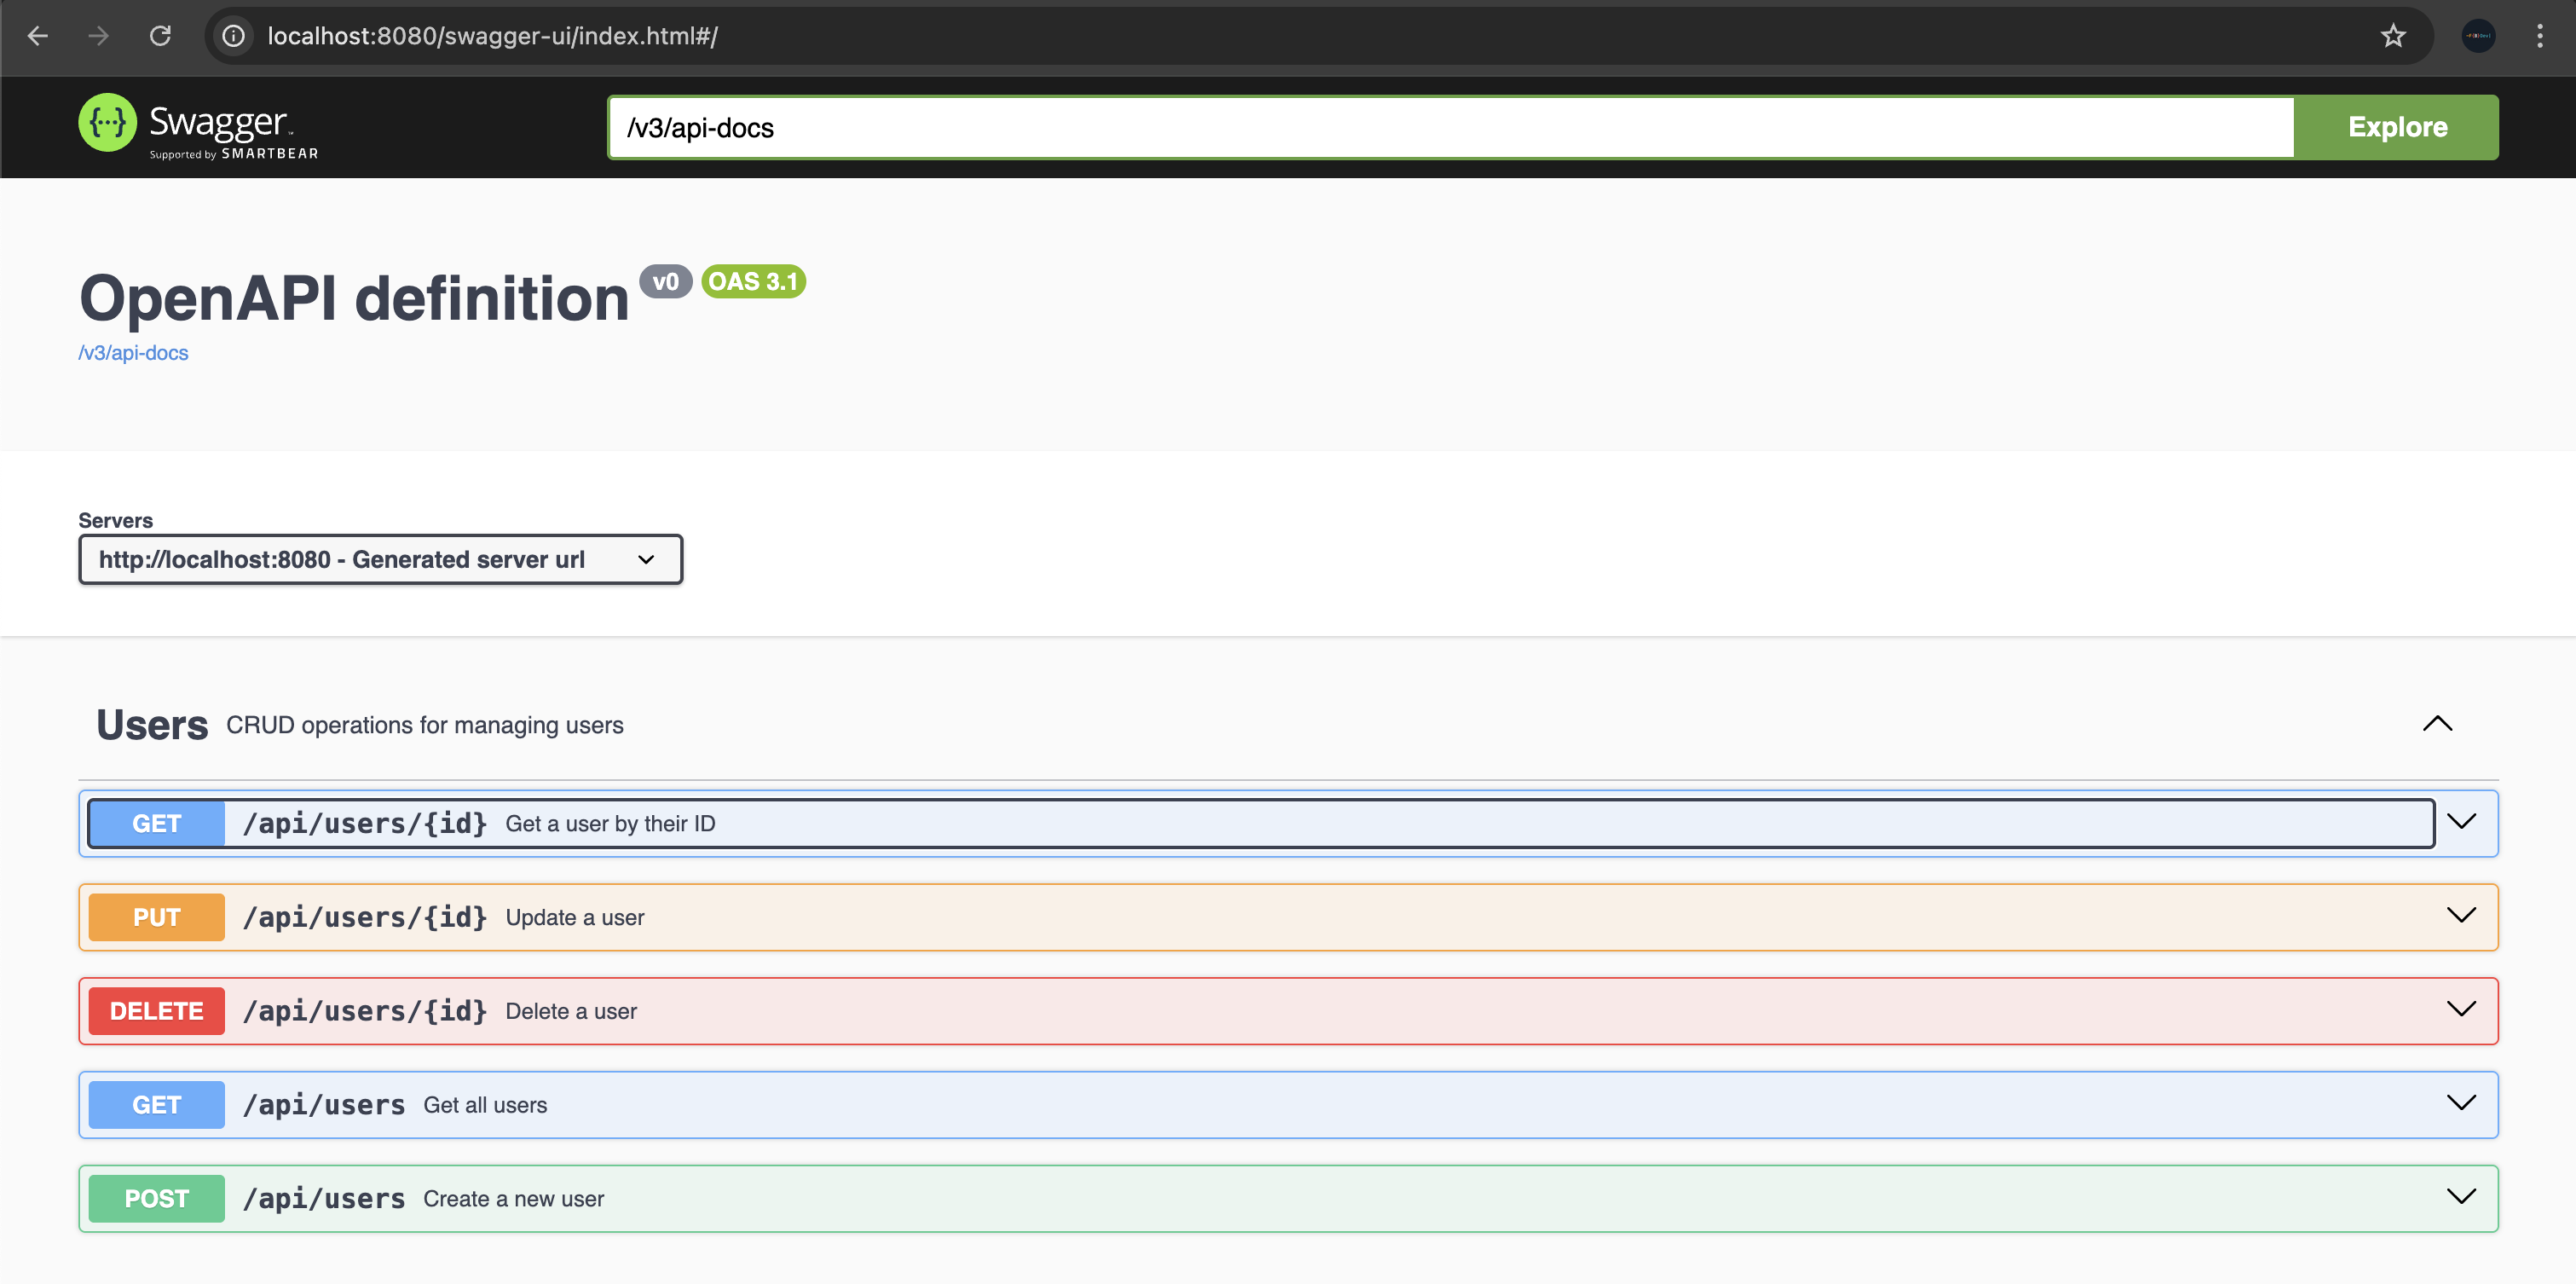
You can now visit http://localhost:8080/swagger-ui/index.html to see the extra information that's been added to the UI:
Swagger Model Annotations
We can also use the following annotations on the data models for our API to give the user a better idea about any necessary requirements. For example whether a field for a model is required or if a String field on a model must be under a certain length.
@Schema- used to describe and provide examples for classes and fields@NotNull,@Size,@Minand@Max- these were added in Input Validation & Error Handling with Spring Boot and are automatically picked up and displayed in Swagger.
Here's a full example of applying the Swagger annotations to UserCreateRequest, UserResponse and UserUpdateRequest:
UserCreateRequest
// UserCreateRequest.java
@Schema(description = "Payload to create a new user")
public class UserCreateRequest {

    @Schema(description = "Full name of the user", example = "Jon Smith", requiredMode = Schema.RequiredMode.REQUIRED)
    @NotNull(message = "Name is required")
    @Size(min = 2, max = 100, message = "Name must be between 2 and 100 characters")
    private String name;

    @Schema(description = "Email address of the user", example = "jon@example.com", requiredMode = Schema.RequiredMode.REQUIRED)
    @NotNull(message = "Email is required")
    @Email(message = "Email must be valid")
    private String email;

    @Schema(description = "Age of the user", example = "30", requiredMode = Schema.RequiredMode.REQUIRED)
    @Min(value = 18, message = "Age should not be less than 18")
    @Max(value = 150, message = "Age should not be greater than 150")
    private int age;
    // Rest of class
}
UserResponse
// UserResponse.java
@Schema(description = "Response object for a user")
public class UserResponse {

    @Schema(description = "Unique ID of the user", example = "1")
    private Long id;

    @Schema(description = "Full name of the user", example = "Jon Smith")
    private String name;

    @Schema(description = "Email address of the user", example = "jon@example.com")
    private String email;

    @Schema(description = "Age of the user", example = "30")
    private int age;
    // Rest of class
}
UserUpdateRequest
// UserUpdateRequest.java
@Schema(description = "Payload to update an existing user")
public class UserUpdateRequest {

    @Schema(description = "Updated name of the user", example = "Jon Smith Updated", requiredMode = Schema.RequiredMode.REQUIRED)
    @NotNull(message = "Name is required")
    @Size(min = 2, max = 100, message = "Name must be between 2 and 100 characters")
    private String name;

    @Schema(description = "Updated email address of the user", example = "jon-updated@example.com", requiredMode = Schema.RequiredMode.REQUIRED)
    @NotNull(message = "Email is required")
    @Email(message = "Email must be valid")
    private String email;

    @Schema(description = "Updated age of the user", example = "35", requiredMode = Schema.RequiredMode.REQUIRED)
    @Min(value = 18, message = "Age should not be less than 18")
    @Max(value = 150, message = "Age should not be greater than 150")
    private int age;
    // Rest of class
}
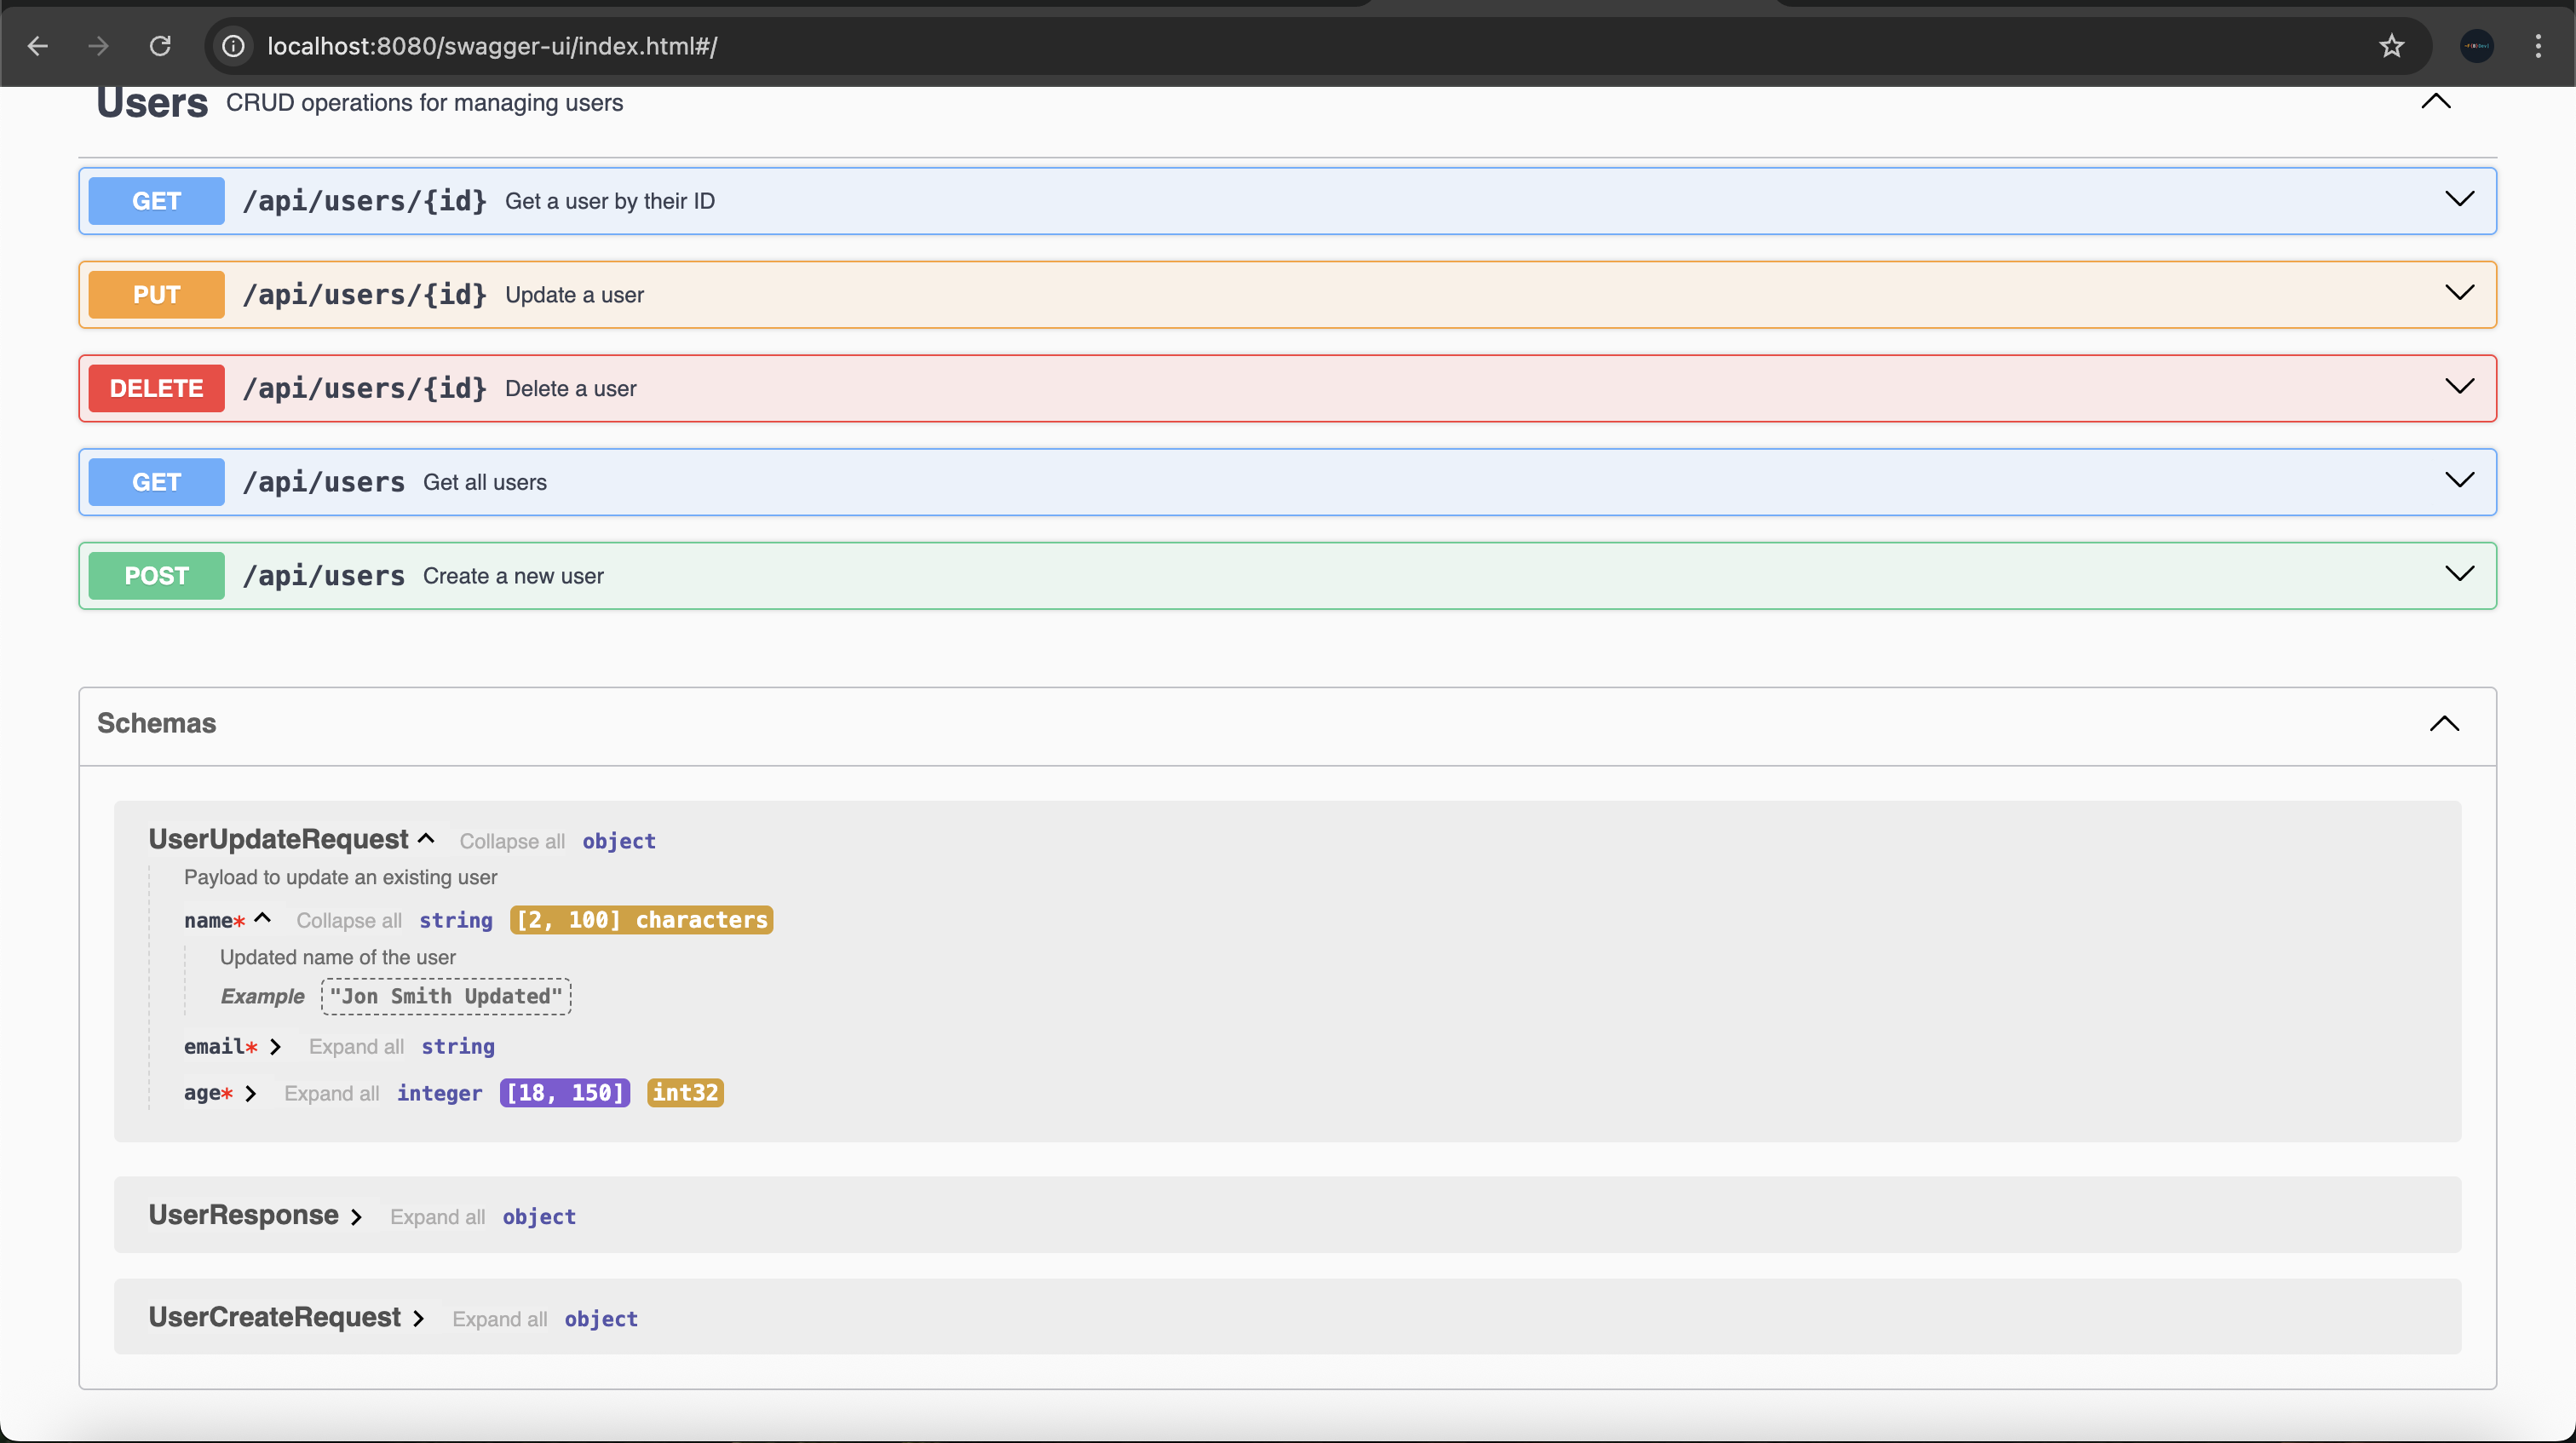
You can now visit http://localhost:8080/swagger-ui/index.html to see the extra information that's been added to the UI:
Swagger Configuration
We can also apply different configuration options to Swagger using the application.yml properties file. Here's an example configuration:
# application.yml
springdoc:
  swagger-ui:
    enabled: ${SWAGGER_ENABLED:true}
    path: /docs
    operationsSorter: method
    tagsSorter: alpha
  api-docs:
    path: /doc-json
That's great, but what do these configuration options mean. Well:
springdoc.swagger-ui.enabled- controls whether the Swagger UI is enabled or disabled. If you have an insecure Swagger UI, you may want to disable it in production.springdoc.swagger-ui.path- this sets the path where the Swagger docs are accessible. So we change it to something easier to remember like/docs. We can now visit the docs at http://localhost:8080/docs.springdoc.swagger-ui.operationsSorter- Controls how operations (endpoints) are sorted in the UI. Available values include:alpha- alphabeticallymethod- by HTTP methods (GET,POST, etc.)none- no specific sorting
springdoc.swagger-ui.tagsSorter- Controls how the tags (groupings of endpoints) are sorted in the UI. Again available values include:alpha,methodandnone.springdoc.api-docs.path- this sets the endpoint where the raw OpenAPI JSON is available. So we can set it to something like/docs-json. Then we can access the JSON using http://localhost:8080/docs-json
You can find all other configuration properties for Swagger here.
What's Next?
So to recap we:
- Learnt what Swagger is, how it works and why it's helpful
- How to set up and run Swagger in our Spring Boot application
- How to customise the Swagger UI
- How to apply different configuration options to Swagger